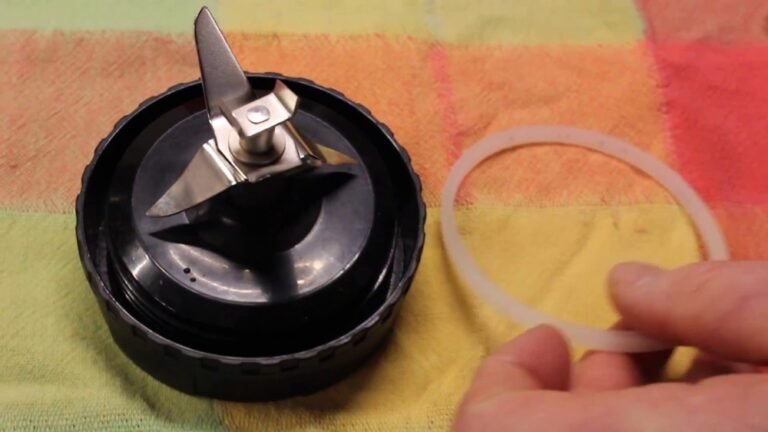
How To Open A Stuck Ninja Blender Cup: 2 Easy Fixes
Learning how to open a stuck Ninja Blender Cup is best achieved by running the base under warm water for thirty seconds to expand the seal or using a rubber jar opener for extra torque. These methods address the vacuum seal that often forms as contents cool. The right approach depends on whether the jam is caused by food residue or a tight vacuum.
Who needs to open a stuck blender cup
This guide is for kitchen users who find their blender cup locked tight to the blade base after a cycle. You likely have a personal-size Ninja blender and are currently unable to unscrew the base, causing frustration. Some users have already tried pulling with force, which usually makes the grip tighter, while others are worried about breaking the plastic threads. This page serves both the person who just finished blending a smoothie and the one who left the cup sitting for hours, allowing the seal to tighten. We assume you have a standard Ninja blender model with a removable blade assembly. If you’re a technician or have already attempted to pry the assembly open with metal tools, this guide isn’t for you, as prying can damage the plastic housing and void your warranty. We focus on non-destructive methods that prioritize the safety of your appliance and your hands.
Factors that influence the seal
The primary cause of a stuck cup is a vacuum that forms as hot ingredients cool inside the container. When you blend, the motor creates heat, and as the air inside cools, it contracts, pulling the cup tighter onto the rubber gasket. If you find the cup stuck, the temperature difference between the blender contents and the ambient room air is the most likely culprit.
Another factor is dried food residue in the threads. If sugary liquids or thick purees leak into the gap between the cup and the blade base, they act like glue once they dry. This makes the friction significantly higher than a simple vacuum seal. You can check for this by looking at the seam where the cup meets the base; if you see visible crusting, residue is the problem.
The third element is the tension of the rubber gasket. If the gasket is worn, twisted, or misaligned, it can bunch up in the threads, preventing the cup from turning smoothly. In our experience, people often try to force the cup open by twisting harder, which actually compresses the gasket further. This is a common mistake that causes the cup to lock even more securely. If you can’t rotate the cup at all, stop applying pressure, as excessive force can crack the plastic threads on the cup or the base.
Step by step
- Place the stuck cup and blade base upside down in a sink filled with two inches of warm water.
- Let the assembly soak for one minute, ensuring the water level covers the seam between the cup and the blade base.
- Remove the cup from the water and dry the exterior thoroughly with a towel to improve your grip.
- Wrap a silicone jar opener or a dry, textured kitchen towel around the base of the cup to prevent slipping.
- Hold the blade assembly firmly with one hand while using your other hand to twist the cup counter-clockwise.
- If the cup doesn’t move, tap the edge of the blade base gently against the edge of a wooden cutting board to break the seal.
- Check the gasket for debris or damage; if it appears flat or cracked, replace it immediately to prevent future locking.
- Rinse the threads with warm water to remove any lingering food particles that might cause sticking during the next use.
The judgement call here is knowing when to stop. If you have applied firm pressure with a rubber grip and the cup remains immovable, don’t use a wrench or pliers. These tools will shatter the plastic housing. If you can’t open it by hand after two attempts, the internal vacuum is too strong for simple methods. You should leave the cup on the counter for two hours to reach room temperature, which often releases the pressure naturally.
Methods for different situations
The following table outlines how to handle different sticking scenarios based on the state of your blender cup.
| Situation | Recommended Action | Effort Required | What to watch for |
|---|---|---|---|
| Vacuum seal | Run warm water over base | Low | Water temperature |
| Dried food residue | Soak in warm soapy water | Medium | Sticky threads |
| Over-tightened | Use rubber grip pad | High | Plastic cracking |
| Misaligned gasket | Apply firm, steady pressure | Medium | Gasket bunching |
| Damaged threads | Seek professional repair | High | Visible white stress marks |
If you encounter a vacuum seal, ensure the water temperature stays below 120°F. Hotter water can warp the seal, permanently ruining the airtight fit.
For over-tightened lids, never use metal tools like pliers. Metal teeth bite into the plastic, creating burrs that make future removal impossible. If the grip pad fails, use a hairdryer on the low setting for thirty seconds. This expands the outer ring just enough to break the friction lock.
Distinguish between a misaligned gasket and damaged threads by checking for resistance. If the lid turns halfway and stops abruptly, the gasket is bunched. If the lid spins freely without tightening, the threads are stripped. In the latter case, stop immediately.
Maintaining the seal
Preventing future jams
Always ensure the rubber gasket is seated flat in its groove before screwing on the blade base. If the gasket is folded, it creates uneven pressure that leads to a stuck cup after the blending cycle is complete. Additionally, avoid over-filling the cup past the maximum liquid line, as excess volume forces ingredients into the threads.
Signs of wear
Check the rubber gasket for signs of brittleness or thin spots every time you clean the unit. A healthy gasket should be soft and flexible; if it feels hard or shows signs of cracking, it will no longer provide a smooth seal. Replace the gasket immediately if you notice it slipping out of the groove during normal operation. Never run the blender if the gasket is missing, as this will cause leaks and almost certainly result in a jammed assembly.
What goes wrong, and what to do
| What you notice | What it usually means | What to do first | How to stop it happening again |
|---|---|---|---|
| Cup won’t turn | Vacuum suction lock | Run under warm water | Don’t over-tighten |
| Sticky exterior | Food residue leaks | Soak in warm soap | Rinse threads after use |
| Grinding noise | Misaligned gasket | Inspect the seal | Seat gasket flat |
| Plastic clicking | Damaged threads | Stop twisting | Avoid over-tightening |
| Leaking liquid | Worn gasket | Replace the ring | Check gasket regularly |
If the cup remains stuck after warming, don’t force the lid. You risk stripping the plastic threads permanently.
Most users confuse a vacuum lock with a cross-threaded lid. If you feel resistance before the lid is halfway on, stop immediately. Forcing it causes micro-fractures in the seal. If you see white stress marks on the plastic, the structural integrity is compromised and the cup will never be leak-proof again.
When inspecting gaskets, look for tiny nicks or flattened edges. A gasket that has lost its round profile will fail under heat. If you notice persistent leaking, replace the ring before the liquid ruins your bag. A simple rule applies: if the seal doesn’t spring back when pressed, it’s time for a new one.
Safety and operational standards
The primary limit for your appliance is the integrity of the plastic housing. Ninja blenders are designed for specific torque levels; using external tools like metal wrenches exceeds these limits and can cause the plastic to shatter, leading to sharp fragments. Always follow the manufacturer’s guidance regarding the maximum temperature of ingredients, as blending boiling liquids can create extreme pressure that the cup isn’t rated to withstand. If you notice any cracks in the cup or the blade assembly, stop using the unit immediately. Consult the official user manual for your specific model to see the weight and volume limits, as exceeding these can cause the motor to labor and the seal to lock. If you’re unsure if your cup is damaged, check the manufacturer’s website for the visual inspection criteria for your specific blender series.
Costs of a stuck cup
The cost of a stuck cup is usually measured in time and effort rather than money. If you force the cup open and break the plastic threads, you’ll need to purchase a replacement cup or blade assembly, which typically costs a modest amount depending on the model. To avoid this cost, prioritize patience over force. Spending five minutes soaking the cup in warm water is significantly cheaper than replacing the entire component. If you find yourself struggling with this issue frequently, it indicates that you’re either over-tightening the base or failing to clean the threads properly. Investing a few extra seconds to wipe the threads with a damp cloth after each use prevents the residue buildup that makes the cup stick. This small habit saves you the time of troubleshooting and the expense of buying replacement parts for your blender.
Keeping it right afterwards
To keep your blender operating smoothly, establish a routine of cleaning the threads after every session. If you notice that the cup feels difficult to screw on, inspect the threads for dried debris or a loose gasket. A properly functioning seal should be tight enough to prevent leaks but loose enough to open with a firm, one-handed twist. If the gasket begins to slip out of place, use a blunt toothpick to gently push it back into the groove before the next use. If you see white stress marks on the plastic threads, this is a sign that you’re applying too much force when closing the cup. Reduce your tightening strength by one-quarter turn to protect the plastic.
When this is the wrong approach
If the blade assembly is completely seized and you hear a crunching sound when trying to turn it, don’t continue. This indicates that the plastic threads have already been stripped or that the internal locking mechanism is broken. Forcing it further will only cause the housing to fail, potentially exposing the blade assembly. In this case, stop all attempts to open it and contact the manufacturer’s customer service department for a warranty claim or repair options. Another situation where this approach is wrong is if you suspect the motor base itself is the problem. If the blade doesn’t rotate when the unit is plugged in, the issue is internal to the appliance. Don’t attempt to open the motor base, as the capacitor inside can hold a lethal charge even when the unit is unplugged.
Frequently asked questions
Can I use a metal wrench to open my Ninja cup?
No, you should never use a metal wrench on your blender cup. Metal tools exert too much pressure on the plastic, which will cause the threads to crack or the entire assembly to shatter during the attempt.
Why is my Ninja cup stuck after blending?
The cup is likely stuck because of a vacuum seal that formed as the contents cooled down. As the air inside contracts, it pulls the cup tighter against the rubber gasket, making it difficult to twist open.
How long should I soak the cup to release it?
Soak the cup for at least one minute in warm water. This time allows the heat to transfer to the plastic, causing it to expand slightly and breaking the vacuum seal that holds the base in place.
Is it safe to put the cup in the freezer to loosen it?
No, freezing the cup will make the plastic brittle and tighten the seal further. Always use warm water to expand the materials, as this is the safest way to release the pressure without damaging the cup.
What happens if I keep forcing the cup open?
If you continue to force a stuck cup, you’ll eventually strip the plastic threads or crack the housing. Once the threads are damaged, the cup will no longer seal properly, and you’ll have to replace the assembly.
Does it matter if I wash the threads after every use?
Yes, washing the threads is the best way to prevent sticking. Dried food residue acts as a glue between the cup and the base, which makes the cup much harder to open than a simple vacuum seal.
What to do next
Start by soaking the base in warm water as described in the steps above to release the vacuum. You should feel the cup begin to loosen after thirty seconds of gentle turning with a rubber grip.
If you hear a cracking sound or the cup remains stuck, stop immediately and contact the manufacturer’s support team for further guidance. Attempting to force the seal when the material is brittle often leads to permanent structural failure.
If the base resists after two minutes of soaking, check the temperature of your water. If the water is below 110°F, increase the heat slightly. However, don’t exceed 140°F, as extreme heat can warp the internal gaskets.
Final Thoughts
Once your container is finally loose, wash the rubber gasket thoroughly to prevent future buildup. If it still feels stubborn after you’ve cleaned it, a tiny drop of food-grade oil around the rim will help it glide on smoothly next time. You’ll find that a little maintenance keeps everything running perfectly.