
How To Put The Blade In A Ninja Blender: A Simple Guide
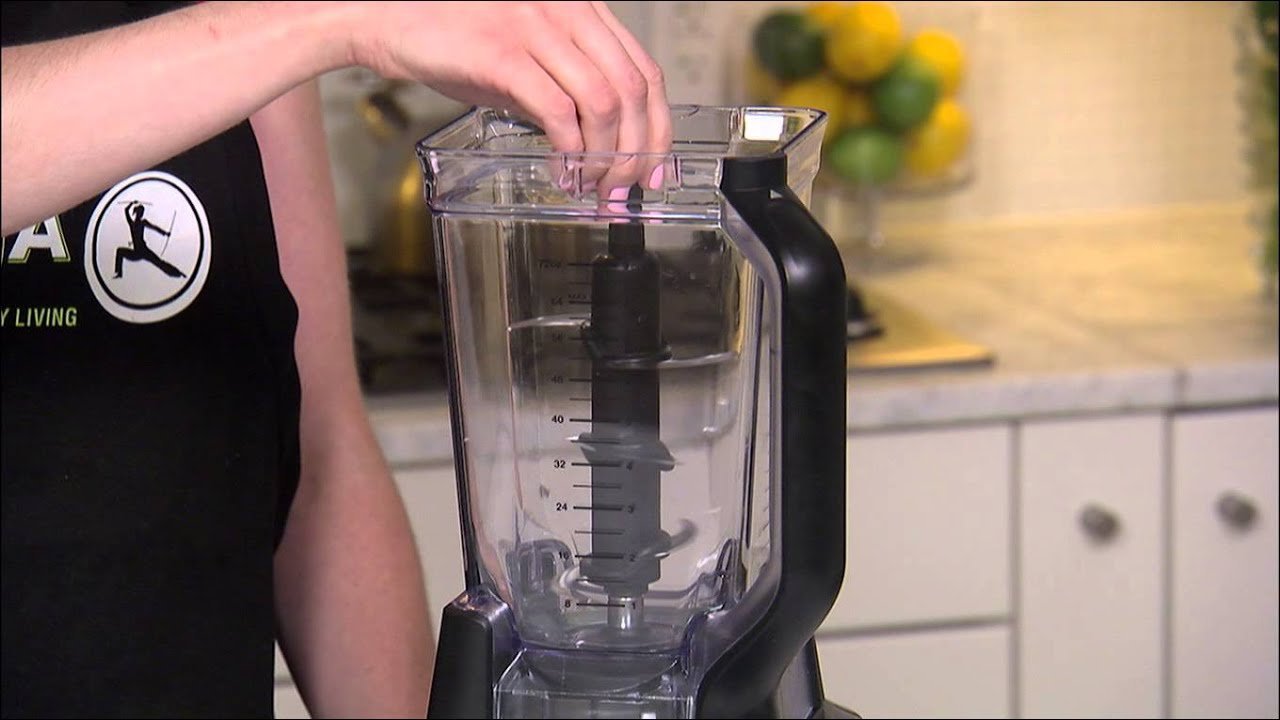
To ensure your machine works safely, you must seat the blade assembly onto the center gear inside the jar before adding any ingredients. You can install the blade tower in a ninja blender by aligning its plastic hub with the drive shaft at the bottom of the container and pressing down until it clicks or sits flush.
Your specific model changes this process, as some Ninja systems use a single central tower, while others use a different locking mechanism for their food processor bowls. We assume here that you’re using a standard Ninja pitcher or blender jar.
Who needs to assemble a Ninja blender blade
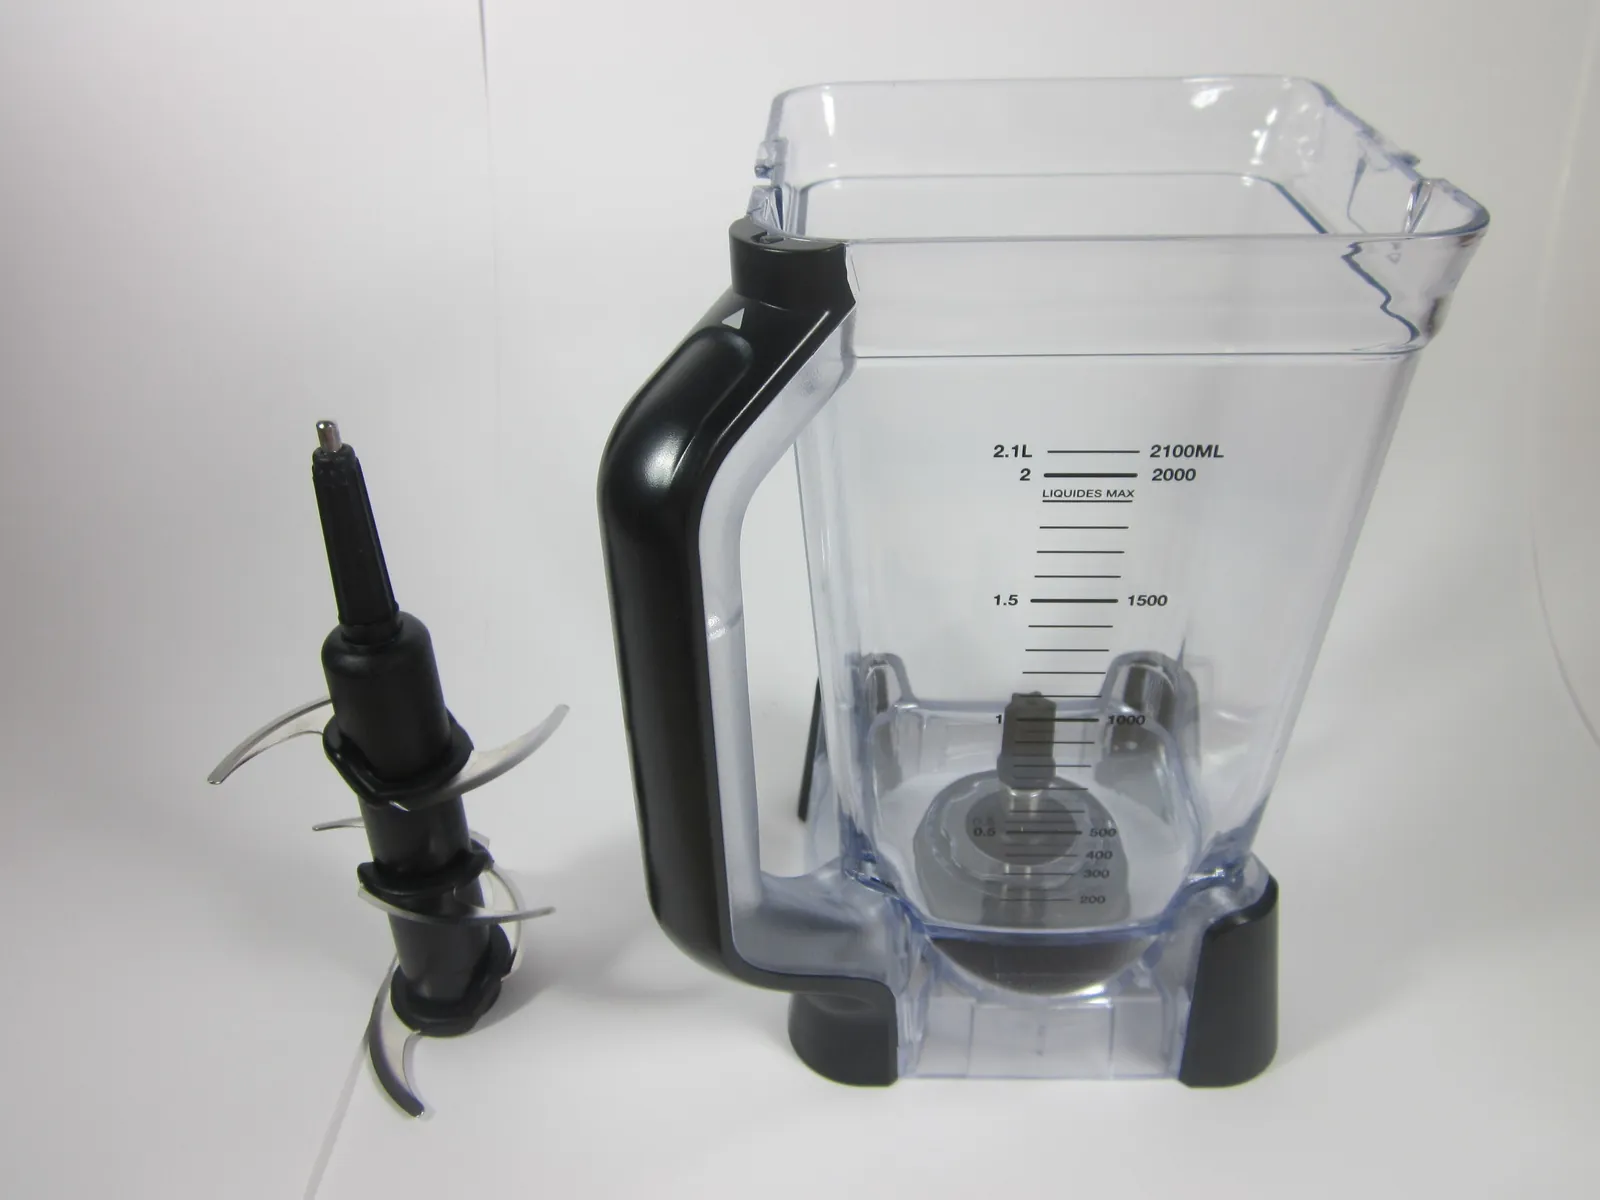
This guide serves home cooks who own a Ninja blender and need to assemble the blades for daily use. You might have just taken the device out of the box, or perhaps you’re confused after cleaning the parts and can’t remember how they lock together. This page assumes you’re using a standard Ninja blender model with a removable blade tower.
If you’re trying to assemble a model that has blades permanently attached to the bottom, this guide isn’t for you. In that case, you should check your specific manual to see if the blades are meant to be removed at all. For those with a removable tower, this information ensures the assembly doesn’t wobble or damage the plastic jar during high-speed blending.
We focus on the physical placement of the blade, not on recipe techniques or motor settings. If you have misplaced the locking nut or the blade hub looks damaged, don’t attempt to force it into place. A damaged blade tower can shatter or strip the gear, which creates a serious safety risk during operation.
Factors that change the assembly
The most important factor is the specific model of your Ninja blender. Some models use a tall, multi-tier blade tower that fits onto a central pin, while others use a small, compact blade assembly for personal-sized cups. You should always check the base of your jar to see if there’s a metal pin or a plastic gear that the blade must grip.
Another factor is the cleanliness of the drive shaft. If food debris or dried liquid builds up on the bottom gear, the blade tower won’t sit level. This lack of contact prevents the blades from spinning at the correct speed and often causes the motor to smell like burning plastic. You must wipe the bottom of the jar with a damp cloth before every assembly. The age of the unit also plays a role in how easily the blade locks.
If the plastic hub on the blade tower shows signs of wear or rounded edges, it may feel loose even when properly installed. If you notice it does not “bite” onto the gear, you should contact the manufacturer to order a replacement tower. Never use a blade that feels loose, as it can lift up and hit the walls of the jar while the machine is running.
Installing the blade assembly
- Place the empty blender jar on a flat, stable surface like your kitchen counter.
- Hold the blade tower by the top plastic handle or the central post, keeping your fingers away from the sharp edges.
- Lower the blade assembly vertically into the center of the jar.
- Rotate the blade tower slowly until the plastic hub at the bottom aligns with the gear on the jar floor.
- Push down firmly on the top of the tower until you feel it drop into position.
- Give the tower a gentle twist; it should stay in place and not lift up when you pull on it.
- Add your liquids or soft ingredients before adding hard items like ice or frozen fruit.
- Secure the lid tightly before you press any power button on the base.
The critical judgement call here is the “click” or firm seating. If the blade tower moves more than a few millimeters when you pull it upward, it isn’t engaged. A blade that isn’t fully seated will cause loud rattling and can gouge the plastic interior of your pitcher.
If you find the blade is stuck and won’t come out for cleaning, don’t use tools like pliers to yank it. Instead, soak the jar in warm, soapy water for 15 minutes to soften any sticky residue that might be holding the hub in place. If the blade remains stuck after soaking, you must stop and call the manufacturer’s support line, as forcing it can break the internal seal.
Comparing different assembly types
| Situation | Action | Effort | Watch for |
|---|---|---|---|
| Standard Pitcher | Slide onto center pin | Low | Full vertical seating |
| Food Processor | Lock into center post | Medium | Clicking sound |
| Personal Cup | Screw on blade base | Low | Tight rubber seal |
| Damaged Hub | Inspect for cracks | High | Loose fit |
| Sticky Residue | Soak in warm water | Medium | Debris buildup |
When seating a standard pitcher, ensure the base sits flush against the motor housing.
For food processors, the clicking sound is your only confirmation of safety. If the unit hums but the blade remains stationary, you have failed to engage the safety interlock. Stop immediately to prevent motor burnout.
Personal cups require a firm twist until the rubber gasket compresses. A common mistake is overtightening, which causes the seal to bulge and leak into the motor base. If you feel resistance, stop.
Always inspect the hub for hairline fractures before every use. Operating a cracked hub under load often causes the unit to shatter, which creates a permanent, unrepairable failure of the drive shaft.
Details that define a professional result
Preparing the container
Experienced users always check the jar for cracks before they insert the blade. A tiny crack at the bottom of the jar can grow into a major leak once the weight of the ingredients and the force of the motor are applied.
They also ensure the jar is completely dry on the outside to prevent it from slipping on the base during the initial start-up. If you see any water droplets inside the drive gear area, wipe them out with a dry paper towel to maintain a clean connection.
Handling the blade tower
The mistake most people make is grabbing the blade tower by the blades themselves, which is dangerous and can bend the metal over time. Always hold the plastic center post, which is designed to keep your skin away from the sharp edges.
When placing the tower, let gravity help you; if it doesn’t fall into place, rotate it one quarter-turn at a time. Never force the blade down if it feels blocked, as this usually means a piece of food is trapped underneath the hub.
Troubleshooting common assembly issues
| What you notice | What it usually means | What to do first | How to stop it |
|---|---|---|---|
| Rattling sound | Blade not seated | Remove and realign | Check for debris |
| Blade won’t turn | Gear is blocked | Clear bottom gear | Clean after use |
| Leaking liquid | Seal is worn | Inspect rubber ring | Hand wash parts |
| Blade feels loose | Worn plastic hub | Replace blade tower | Avoid overfilling |
| Stuck assembly | Dried food debris | Soak in hot water | Rinse immediately |
If you hear a rhythmic clicking, the blade is likely hitting the housing. Stop the motor immediately to prevent stripping the plastic drive socket. If the blade fails to spin, check the underside for small food particles. A single grain of rice can jam the gear mechanism entirely.
When liquid leaks from the base, the rubber gasket has likely lost its elasticity. Don’t attempt to re-seat a brittle seal; it will fail again within minutes. Replace the ring if it shows any visible cracking or permanent deformation.
Avoid the common mistake of running the assembly through a high-heat dishwasher cycle. This warps the internal plastic components, leading to permanent misalignment. Never force the base by hand, as this risks cracking the main housing.
Rules for safe operation
The Consumer Product Safety Commission warns that blender blades are extremely sharp and can cause severe lacerations. You must keep your hands away from the blade tower during assembly and never leave the blade inside the jar when you’re scooping out food. If you’re cleaning the blades, wash them by hand using a long-handled brush rather than reaching into the jar.
Don’t attempt to modify the blade tower or the drive gear on the motor base. These parts are balanced for high-speed rotation, and any change can cause the machine to vibrate violently or fail. A common mistake is using a metal spoon to scrape the sides while the unit is plugged in; this risks contact with the blades and potential electrical shorts.
If your Ninja blender has a specific safety interlock, the machine won’t turn on if the lid isn’t locked into the handle. Never try to bypass this sensor with tape or objects, as it’s there to prevent the blades from spinning while the jar is open.
If the sensor isn’t working, unplug the unit and contact the manufacturer for a repair or a replacement lid. If the motor smells like burning plastic, stop immediately; this indicates the drive gear is slipping, which poses a fire risk if operation continues.
What it costs you
The cost of maintaining your blender is primarily your time and the occasional replacement of parts. A new blade tower is relatively inexpensive compared to the price of a new machine, depending on the specific model and where you source it. You can find the exact model number on the bottom of your motor base, which you should use when searching the official Ninja website for parts.
The real cost of skipping the assembly check is the price of a new jar. If a loose blade damages the interior wall, the jar is no longer safe to use, and a replacement jar is a significant expense. You also risk the cost of wasted ingredients if the jar leaks during a blend.
By spending 10 extra seconds to confirm the blade is locked before you start, you protect the investment you made in the appliance. If you notice the plastic hub is starting to look “chewed” or rounded, replace it immediately rather than waiting for it to fail while you’re blending a full load of food.
Maintaining the assembly afterwards
To keep your blender working, you should rinse the jar and the blade tower immediately after every use. Don’t let food sit on the blades for hours, as the acidity in fruits and vegetables can corrode the metal edges over time. Once rinsed, let the blade tower air dry completely on a rack before you store it back inside the jar.
If you store the blade tower inside the jar, place a soft cloth or a paper towel between the blade and the bottom of the jar to prevent scratching. You’ll know the assembly needs attention if the blade starts to make a high-pitched squealing sound during operation. This often means the internal bearing in the tower is failing or that there’s grit in the gear.
If you hear this noise, stop using the unit and inspect the base of the tower for any dark, oily residue. This is a sign that the internal lubricant is leaking, and you should stop using that blade tower entirely to avoid contamination.
When this is the wrong approach
If you’re dealing with a motor base that doesn’t turn on or makes a loud grinding noise even when the jar is empty, the problem isn’t the blade placement. In this case, the issue likely lies within the motor or the internal coupling of the unit. You shouldn’t attempt to open the motor housing, as the capacitors inside can hold a lethal electrical charge even when the unit is unplugged.
If your blender jar is cracked or the plastic is cloudy and brittle, don’t try to fix it with glue or tape. These materials won’t hold under the pressure of the motor and will fail, potentially throwing sharp plastic shards into your food. You must discard any cracked jar and purchase a new, authentic replacement part from the manufacturer.
A common mistake is assuming that a “leaking” jar always requires a new blade assembly. If the liquid is pooling at the base of the jar, check the rubber gasket first. If the gasket is flat or compressed, an inexpensive replacement ring often solves the problem. If the leak persists after a gasket swap, the structural integrity of the jar’s threads is likely compromised, and the entire vessel must be replaced.
If you’re experiencing repeated issues with the blade not seating, it may be time to consult with a professional technician or look into a warranty claim if your machine is still within the coverage period.
Frequently asked questions
Can I put the blade in a ninja blender while it’s full?
No, you must place the blade in the jar before you add any ingredients. Adding the blade to a full jar makes it impossible to check if the hub is properly aligned with the gear, which leads to the blade sitting unevenly and damaging the bottom of your container.
How long should the blade last?
The blade tower typically lasts for a long period with regular daily use, assuming you wash it by hand and avoid blending hard, non-food objects. You’ll know it’s time for a replacement if the blades look dull, the plastic hub shows visible wear, or you notice leaking at the base.
Is it safe to wash the blade in the dishwasher?
Most Ninja blade assemblies are top-rack dishwasher safe, but hand washing is better for the longevity of the seals. High heat from a dishwasher can warp the plastic housing or degrade the rubber gasket over time, which eventually causes leaks that ruin the blade’s internal bearings.
What happens if the blade isn’t locked?
The machine will make a very loud, rattling noise, and the blades will likely fail to process the food evenly. If you continue to run the blender in this state, the spinning blade tower will carve deep grooves into the bottom of the jar, permanently ruining the container.
Does it matter if the blade is wet when I install it?
It doesn’t matter if the blade is wet, but you should ensure the drive gear on the bottom of the jar is free of debris. While water is fine, any small particles of food stuck to the gear will prevent the blade from seating flush, causing the same issues as a loose blade.
Why is my blade tower getting stuck?
The blade tower usually gets stuck because sticky food residue like dried fruit or sugar has hardened inside the gear housing. You should soak the jar in warm, soapy water for 15 minutes to dissolve the buildup, which will allow the blade tower to slide out easily without any force.
How do I know if the blade is damaged?
You can tell the blade is damaged if you see chips in the metal, cracks in the plastic hub, or if the unit makes a grinding sound. If the blade tower wobbles when you push it to the side, the internal bearings are worn out, and you should replace the entire tower.
Conclusion
Start by clearing your workspace and ensuring the jar is empty. Once you place the blade and feel that distinct click, you can safely add your ingredients and lock the lid. If the blade assembly feels loose or doesn’t sit flat against the bottom of the jar, don’t start the motor, as this is the sign that you need to stop and re-seat the part.
One Comment