
How To Remove A Ninja Blender Lid: Simple Steps To Fix It
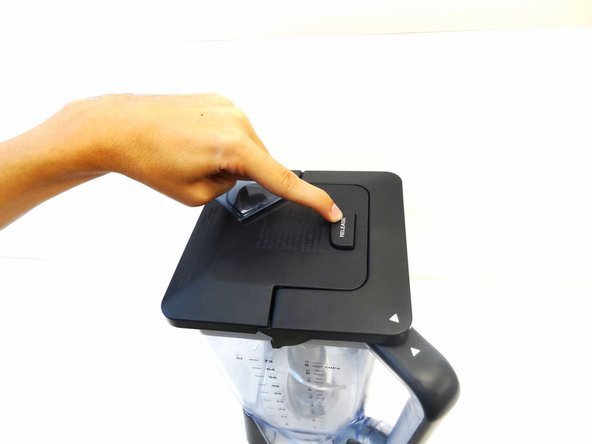
To remove a stuck ninja blender lid, press the release button while simultaneously pulling the handle upward. If the seal is tight due to suction or food debris, you might need to use warm water to loosen the sticky residue around the edges.
This guide assumes you’re using a standard Ninja professional or personal blender model with a locking lid mechanism. If your model has a manual twist-lock top, your experience will differ slightly from these instructions.
Who needs to remove a Ninja lid
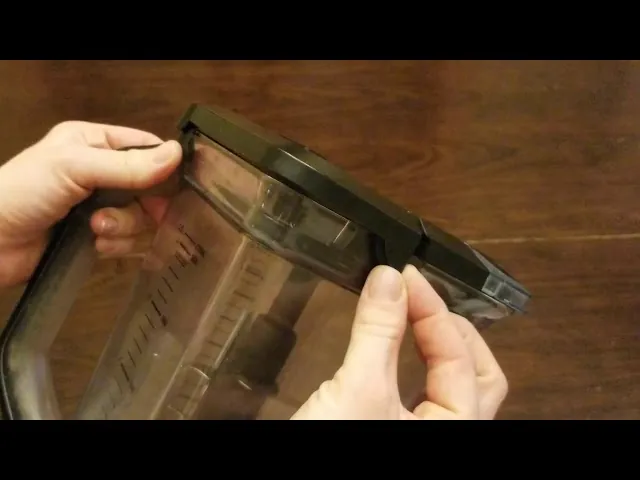
This article serves users who own a Ninja blender and struggle with a lid that refuses to release after a blending cycle. These users may feel frustrated or worried that they might break the plastic components by pulling too hard. If you’re currently dealing with a cracked pitcher or a lid that has physically melted due to extreme heat, this page isn’t for you. You should contact Ninja customer support directly instead of attempting to force the lid open.
We assume you’re trying to open a lid that’s locked by the automatic vacuum or suction mechanism common in most Ninja high-speed blenders. If you’re using an older model that relies on a simple screw-top design, the steps provided here won’t apply to your specific device.
This content is written for the home cook who needs a safe, reliable way to access their blended contents without damaging the plastic locking tabs or the rubber gasket. If you haven’t yet cleaned the exterior of your pitcher, please do so before starting, as dried food can make the release button difficult to depress fully.
Factors that change the release
Several conditions change how easily you can open your blender lid. The most common factor is the temperature of the contents inside the pitcher. When you blend hot liquids, steam creates a vacuum effect that pulls the lid tightly against the rim. This makes the release button much harder to press compared to when you blend room-temperature ingredients.
Another factor is the amount of residue left in the locking mechanism. If you have blended sticky ingredients like honey, nut butter, or fibrous greens, small particles can get stuck inside the release button housing. This creates friction that prevents the button from travelling its full distance. You can check for this by looking closely at the button’s travel path; if it feels spongy or stops halfway, debris is likely the cause.
Finally, the age of your rubber gasket matters. Over time, the silicone seal can become worn or lose its shape, leading to a tighter fit than the manufacturer intended. You can verify the health of your seal by removing it from the lid and checking for cracks or flattened areas.
If the seal is brittle or visibly deformed, it will continue to cause issues regardless of your technique. People often mistakenly assume the lid is broken when, in fact, the gasket simply needs a deep cleaning or a replacement part from the manufacturer.
Steps for opening the canister
- Ensure the blender is unplugged from the wall outlet to prevent accidental activation during the process.
- Wipe the area around the release button with a damp cloth to remove any dried food or sticky spills.
- Use your thumb to press the release button firmly until you feel it hit the internal stop.
- Grip the handle of the lid with your other hand while keeping the release button fully depressed.
- Pull the lid handle straight up with a steady, even motion; don’t tilt it, as this can catch the locking tabs.
- If the lid doesn’t move, run warm water over the rim of the pitcher for 30 seconds to soften any dried ingredients.
- Dry the exterior and repeat the button-press process, using a gentle rocking motion if the seal remains tight.
The key judgement call is knowing when to stop pulling. If the lid doesn’t move after a firm, steady pull, don’t use tools like screwdrivers or knives to pry it open. These tools can easily gouge the plastic or tear the rubber gasket, which ruins the vacuum seal permanently. If the lid remains stuck after trying warm water, it’s time to stop and consult the official Ninja troubleshooting guide for your specific model number.
The variations of lid release
| Situation | What to do | What it takes | What to watch for |
|---|---|---|---|
| Hot contents | Let it cool down | 15 minutes | Steam pressure |
| Sticky residue | Rinse with warm water | 2 minutes | Sugary buildup |
| Jammed button | Clean with toothbrush | 5 minutes | Debris inside |
| Worn gasket | Replace the seal | 1 minute | Brittle edges |
| Stuck seal | Apply light pressure | 10 seconds | Plastic cracks |
When dealing with hot contents, wait until the exterior of the container feels cool to the touch. If you force the lid while the internal temperature remains high, the resulting steam pressure can cause a violent release. This may lead to burns or damage the locking mechanism.
Sticky residue often stems from syrups or proteins. If you ignore this, the sugars crystallize and act like glue. You must use water no hotter than 110 degrees Fahrenheit to dissolve the blockage without warping the plastic.
A jammed button usually indicates a buildup of fine particles or dried grime. Use a soft-bristled toothbrush to scrub the perimeter of the button. Avoid using metal picks, as they often scratch the housing and create new grooves that trap even more debris.
Check your gasket regularly. If the edges feel brittle or show tiny fissures, it’s time to replace the seal. A worn gasket forces the lid to sit unevenly, which prevents the vacuum release from triggering correctly. Consult your owner’s manual for specific maintenance guidance based on your usage.
Finally, a stuck seal is rarely a mechanical failure. It’s usually a vacuum lock. If the lid doesn’t move after 10 seconds of firm, steady pressure, stop immediately. Applying more force will likely cause the plastic to crack or shatter. If it remains stuck, place the container in a cool, dry area for ten minutes to normalize the air pressure before trying again.
Details that define success
Preparing the equipment
Successful users always inspect the lid before attempting to force it open. Experienced owners know that a clean button housing is the difference between a one-second task and a five-minute struggle. If you see visible buildup, use a soft-bristled toothbrush to clear the path of the release button before you even touch the handle. This prevents the button from getting stuck in the “locked” position while you’re pulling.
Working with the seal
A good result depends entirely on the condition of the rubber gasket. Beginners often ignore the gasket until it fails, but experienced users remove the seal after every heavy use to wash the channel beneath it. If you notice that your lid feels tighter than it did when the machine was new, check the gasket for signs of swelling or deformation. A clean, supple gasket provides a perfect seal without requiring excessive force to lock or unlock the container.
Troubleshooting common issues
| What you notice | What it usually means | What to do first | How to stop it |
|---|---|---|---|
| Button feels stuck | Food debris buildup | Clean with water | Rinse after use |
| Lid won’t budge | Vacuum pressure | Let contents cool | Vent the lid |
| Clicking sound | Broken locking tab | Inspect the tabs | Handle with care |
| Leaking liquid | Worn gasket | Replace the seal | Inspect periodically |
| Tight resistance | Dried residue | Run warm water | Clean rim daily |
Official standards and safety
The safety and operation of your blender are governed by the guidelines provided by SharkNinja, the parent company of the Ninja brand. You can find the specific maintenance instructions for your unit on the official Ninja Kitchen support website. Never attempt to disassemble the lid housing beyond what the user manual permits, as this can void your warranty and cause structural failure.
If you suspect an internal mechanical failure of the locking switch, don’t force the component. Instead, check the manufacturer’s warranty page to see if your unit is still covered for a replacement.
Most users make the mistake of attempting to clear jammed debris by prying the interlocking tabs with a screwdriver. This often snaps the delicate plastic housing, which costs you the entire lid assembly—a replacement part that’s inexpensive compared to buying a new blender. If the switch remains stuck after a thorough warm-water rinse, the internal spring has likely failed.
Use this decision rule to determine your next step. If the blender fails to start despite the pitcher being fully seated and the lid locked, check the display for an error code. An “E” code indicates a sensor malfunction, while a total lack of power suggests a tripped thermal fuse.
If the unit is less than one year old, the standard limited warranty covers these mechanical defects. Don’t attempt a DIY repair if the unit is under warranty, as opening the motor base leaves visible tool marks on the plastic casing. These marks act as an immediate disqualifier for any future claims. When in doubt, contact the Ninja support line directly to initiate a claim before you lose your coverage.
The true cost of maintenance
The cost of maintaining your blender lid is primarily measured in time and attention rather than money. Replacing a standard rubber gasket is inexpensive relative to the cost of a new lid assembly, depending on the specific model and where you source the part.
The most significant cost is the risk of damaging the pitcher assembly by using excessive force. A new pitcher and lid set is expensive, which makes a few minutes of careful cleaning a very economical choice.
A common mistake is scrubbing the gasket with abrasive steel wool or harsh chemical degreasers. This practice creates micro-tears in the rubber, which eventually lead to leaks during high-speed blending. If you see visible cracks or the seal feels tacky to the touch, replace it immediately. Continuing to use a degraded gasket forces the motor to work harder, potentially burning out the drive coupling.
Use this simple decision rule: if the gasket is brittle or fails the “stretch test”—where it doesn’t snap back to its original shape—it’s time for a new one. If it’s merely stained, a soak in warm soapy water is sufficient.
Always check the official website for pricing on genuine replacement parts to ensure compatibility. Generic knock-offs often lack the precise durometer rating required for a vacuum seal, leading to messy spills that cost far more than the savings on the part itself.
Keeping the lid functional
To keep your lid working for years, wash it by hand with warm, soapy water rather than using the high-heat cycle of a dishwasher. High temperatures can cause the plastic locking tabs to warp, which makes the lid difficult to seat properly.
If the lid begins to resist, don’t force it. Instead, inspect the rim of the pitcher for small scratches or gouges. A smooth, glass-like rim is essential for the gasket to create a proper vacuum. Even a microscopic nick can break the seal, causing leaks during high-speed blending.
If the damage is deep enough to catch your fingernail, the pitcher is likely compromised beyond repair.
You can test the gasket’s integrity by filling the pitcher with two inches of water and running it on low for ten seconds. If water beads on the lid exterior, your gasket has lost its elasticity. If the gasket looks dry or cracked, replace it immediately. A worn seal forces the motor to work harder, which can lead to premature burnout of the drive socket.
Finally, store the lid separately from the pitcher. Keeping it locked on the base for weeks at a time compresses the rubber seal, permanently deforming it. By leaving the lid off, you allow the gasket to expand back to its original shape, ensuring a tight fit for every use.
When the lid stays stuck
If you have tried the warm water method and the button is still jammed, the internal spring mechanism may have failed. At this point, you shouldn’t try to pry the lid off with metal tools. Doing so will likely destroy the plastic housing and render the entire pitcher unusable.
The most common mistake here is using a flathead screwdriver to force the seal. This approach often cracks the brittle plastic rim, which permanently ruins the vacuum seal required for proper filtration. If the lid is stuck because of a mineral buildup rather than a broken spring, you’ll notice a gritty resistance when you attempt to twist it. If the resistance feels smooth but firm, the spring has likely snapped.
If you suspect a mechanical failure, check the underside of the lid for a small release pin. If you can depress this pin with a thin paperclip, the lid will often pop free without force.
If the pin doesn’t budge, stop immediately. Contact the manufacturer’s support line or visit their website to see if a replacement lid is available for your specific model. When ordering, ensure you have the model number from the base of the pitcher. Using a lid from a different series—even if it looks identical—often results in a poor seal that causes unfiltered water to bypass the cartridge entirely.
Frequently asked questions
Can I put the lid in the dishwasher?
It isn’t recommended to use the dishwasher for your lid because the high heat can warp the plastic tabs. Hand washing with warm, soapy water is the safest way to maintain the shape of the components. Check your specific user manual to see if your model is labelled as dishwasher-safe.
Why is the lid so hard to remove after blending hot soup?
The lid is hard to remove because the hot air inside the pitcher creates a vacuum as it cools. This pressure pulls the lid down onto the rim, making the release button harder to press. Let the contents cool for 15 minutes to allow the pressure to equalize before opening.
Is it safe to use a knife to pry the lid off?
It isn’t safe to use a knife or other metal tools to pry the lid open. Doing so will likely scratch the plastic or tear the rubber gasket, which prevents the blender from creating a proper vacuum in the future. Always use your hands and warm water to release it.
How do I know if the rubber gasket is worn out?
You know the gasket is worn out if it feels brittle, has visible cracks, or no longer sits flush inside the lid groove. If you notice leaks during blending or the lid feels abnormally tight, inspect the gasket for these signs of wear. Replace it if it shows any damage.
What happens if I keep blending with a loose lid?
If you continue to blend with a loose lid, you risk spraying food across your kitchen and damaging the locking tabs. The blender is designed to operate only when the lid is fully locked into position. Stop immediately and ensure the lid is properly seated if you hear an unusual clicking sound.
How often should I clean the release button?
You should clean the release button after every use to prevent sticky food residue from hardening. A quick rinse under warm water is usually enough to keep the mechanism moving freely. If you blend thick ingredients like smoothies, use a soft toothbrush to reach into the crevices once a week.
Conclusion
Start by checking that the blender is completely unplugged and the area around the release button is clean of any dried food. You can expect the lid to pop open easily once the internal vacuum is broken and the locking tabs are free. If the lid still refuses to move after you have followed these steps, stop and contact the manufacturer to avoid breaking the plastic pitcher.

One Comment