How To Clean Ninja Mini Blender: Quick and Easy Guide
If you own a Ninja Mini Blender, you know how helpful it is for making smoothies, shakes, and quick snacks. But after enjoying your drink, cleaning the blender can feel like a hassle. Many people worry about damaging the blades, leaving behind smells, or not getting rid of stuck food. Cleaning your Ninja Mini Blender correctly is important—not just for taste, but also for health and the blender’s long life. With the right steps, you can clean it quickly and safely every time. Let’s break down the best way to keep your Ninja Mini Blender sparkling, fresh, and ready for your next recipe.
Why Cleaning Your Ninja Mini Blender Matters
Keeping your blender clean is about more than just looks. Old food particles can lead to bacterial growth and bad smells. Over time, if you don’t clean it well, stains and odors become harder to remove. Also, leftover residue can make your drinks taste strange. Clean blades work better and last longer, while dirty ones can dull and rust. Cleaning also helps prevent the base from getting sticky or damaged. For those who use their blender daily, a good cleaning habit saves time, money, and keeps you healthy.
Understanding The Ninja Mini Blender Parts
Before cleaning, it helps to know the main parts of the Ninja Mini Blender. This makes the process easier and ensures nothing is missed. Most Ninja Mini Blenders have:
- Blender cup – Where you place your ingredients.
- Blade assembly – The sharp part that blends your food.
- Sip & seal lid – The cover, often with a spout for drinking.
- Motor base – The electrical part that should never be submerged in water.
Each part needs different care. The cup, blade, and lid are usually dishwasher-safe, but always check your model’s manual first. The base only needs wiping. Taking time to understand your blender means you avoid mistakes that can damage it.
Step-by-step: How To Clean Your Ninja Mini Blender
Cleaning your blender does not have to be complicated. Here’s a simple, effective process that works for most Ninja Mini Blender models.
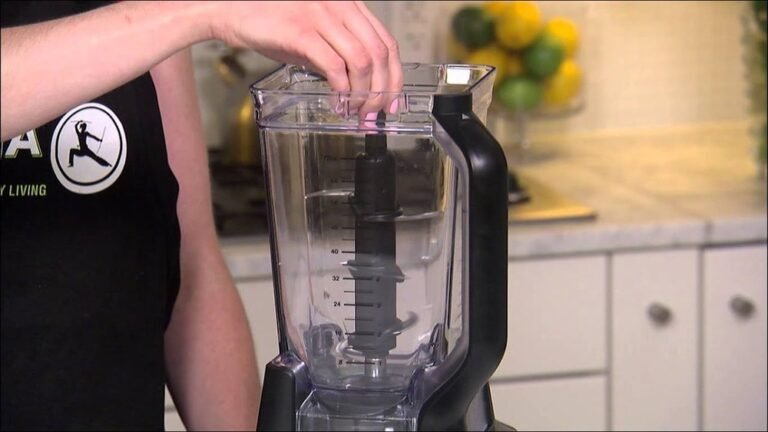
1. Unplug And Disassemble
Always unplug the blender before cleaning. Remove the blender cup, twist off the blade assembly, and take off the lid. If your model has extra accessories, set them aside for separate cleaning.
2. Rinse Immediately After Use
The easiest way to avoid tough stains is to rinse all parts right after using the blender. Fill the cup with warm water and a drop of dish soap, put the lid on, and shake or blend for a few seconds. This removes most residue before it dries.
3. Wash Each Part
Blender Cup
Use warm, soapy water and a non-abrasive sponge to clean inside the cup. Pay attention to the bottom, where food often sticks. For stubborn stains, fill the cup with warm water and a little baking soda. Let it soak for 10–15 minutes, then scrub gently.
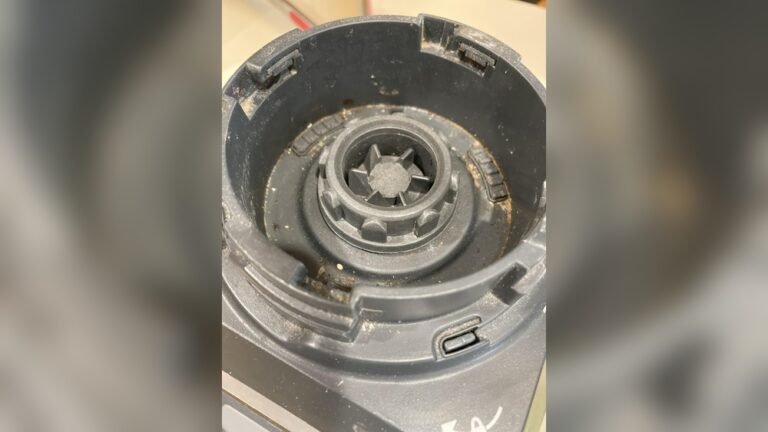
Blade Assembly
The blades are sharp, so handle with care. Use a small brush (a toothbrush works well) to clean around the blades and under the rubber gasket. Never put your hand directly on the blades. Rinse with warm water to remove all soap.
Lid
Wash the lid with warm, soapy water. If the lid has a spout, open it and scrub inside with a brush to clear out trapped food or drink.
Motor Base
Never submerge the base in water. Instead, use a damp cloth to wipe the outside. For sticky spots, use a little dish soap on the cloth, then wipe again with clean water.
4. Dishwasher Tips
Most Ninja Mini Blender cups, lids, and blades are top-rack dishwasher safe. Place them carefully so they don’t bang into other items. Avoid washing the blade with heavy pots or pans to prevent dulling. Always check your manual for specific dishwasher instructions.
5. Dry And Reassemble
After washing, let all parts air dry or use a clean towel. Make sure everything is completely dry before putting it back together. Moisture can cause mold or odors if trapped in closed spaces.
Comparing Cleaning Methods
There are a few ways to clean your Ninja Mini Blender. Here’s a quick comparison:
| Cleaning Method | Time Needed | Best For | Limitations |
|---|---|---|---|
| Manual Washing | 5–10 minutes | Deep cleaning, removing stuck food | Needs more effort, sharp blades |
| Self-Clean (“Blend and Rinse”) | 2 minutes | Quick after-use cleaning | May miss stuck-on particles |
| Dishwasher | Varies (cycle length) | Convenience, hands-off | Not for base; can dull blades over time |
:max_bytes(150000):strip_icc()/sea-personal-blenders-lead-image-nutribullet-smeg-ninja-ashia-aubourg-02-2fe28ce691d047cb956a51c541330b3d.jpeg)
Credit: www.seriouseats.com
Dealing With Common Cleaning Problems
Even with regular cleaning, sometimes you face sticky spots, lingering smells, or cloudy plastic. Here’s how to handle them:
Stubborn Stains
If fruit, coffee, or protein powder leaves stains, soak the cup with a mix of baking soda and water. Let it sit for 30 minutes. Scrub gently. For tough cases, add a little white vinegar.
Bad Odors
Odors often come from trapped food under the blade or in the gasket. Remove the gasket (if possible), wash it separately, and soak parts in a vinegar solution (1 part vinegar to 3 parts water) for 15 minutes. Rinse well to remove the smell.
Cloudy Or Foggy Cup
Over time, the plastic can look cloudy. Wash with a paste of baking soda and water, or use a little lemon juice. Avoid harsh scrubbers, which can scratch the cup.
Mold Or Mildew
If you see black spots or mildew, soak the affected parts in a mixture of vinegar and water. Scrub with a toothbrush. Always dry parts fully to prevent mold from returning.
Deep Cleaning Your Ninja Mini Blender
A regular rinse is fine for daily use, but every few weeks, a deeper clean helps. Here’s how to do it:
- Disassemble everything, including the gasket if your model allows.
- Soak all washable parts (cup, blade, lid, gasket) in warm water with a few tablespoons of vinegar for 20–30 minutes.
- Scrub all parts with a soft brush, focusing on crevices and under the blade.
- Rinse thoroughly with clean water.
- Dry completely before reassembling.
Deep cleaning removes build-up you can’t see and keeps your blender fresh.
Safety Tips When Cleaning
- Unplug first – Always make sure the blender is off and unplugged.
- Handle blades with care – They are very sharp, so never grab them directly.
- Use gentle cleaners – Avoid bleach or harsh chemicals that can damage plastic and rubber parts.
- Don’t soak the base – Only the cup, lid, and blade go in water.
- Check for wear – If you see cracks, rust, or dull blades, replace the part to avoid leaks or injury.
How Often Should You Clean?
Some people only rinse their blender after every use, but regular, thorough cleaning is better. Here’s a suggested schedule:
| Blender Part | After Every Use | Weekly | Monthly |
|---|---|---|---|
| Cup & Lid | Wash or rinse | Deep clean | Check for wear |
| Blade Assembly | Wash carefully | Deep clean | Inspect for dullness |
| Gasket | Rinse if removable | Soak in vinegar | Inspect for mold |
| Motor Base | Wipe down | Wipe thoroughly | Check for damage |
What About Hard Water Stains?
If you have hard water, mineral stains can appear on your blender cup or blades. To remove them:
- Soak the cup and blades in a mixture of equal parts white vinegar and water for 30 minutes.
- Scrub gently with a soft brush.
- Rinse well with clean water.
Hard water can also make the gasket stiff over time, so check it regularly and replace if needed.
How To Clean The Ninja Mini Blender On The Go
Many people use their Ninja Mini Blender at work, the gym, or while traveling. If you can’t wash it right away:
- Rinse with warm water as soon as possible to remove most residue.
- Use a portable cleaning brush or bottle brush to scrub inside the cup.
- Let it air dry with the lid off to prevent odors.
- When you get home, wash all parts thoroughly.
Carrying a small bottle of dish soap and a soft cloth can make quick cleaning easier when you’re not at home.
Non-obvious Cleaning Insights
Most first-time users miss a few key points:
- Hidden gasket build-up: The gasket under the blade traps tiny food particles. If not removed and cleaned, it can cause odors or even mold. Many people don’t realize the gasket is removable on some models. Always check your manual and clean under the gasket when possible.
- Overtightening the blade assembly: Many users twist the blade on too tightly after cleaning, which can crush the gasket or make it harder to remove later. Tighten the blade just enough to prevent leaks, not as tight as possible. This protects both the gasket and your hands in the future.
Signs Your Blender Needs Extra Attention
Watch for these signs that your Ninja Mini Blender needs a thorough cleaning:
- Unpleasant odors that don’t go away after regular washing.
- Cloudy or stained cup even after scrubbing.
- Sticky residue around the blade or gasket.
- Difficulty blending or strange noises (may mean build-up under the blade).
- Visible mold or black spots in any part.
If you notice any of these, do a full deep clean right away.
Mistakes To Avoid When Cleaning
It’s easy to make small errors that can shorten your blender’s life:
- Using steel wool or abrasive pads – These scratch and dull the plastic and blades.
- Leaving the cup closed while wet – This traps moisture and causes odors or mold.
- Forgetting to clean the gasket – Hidden food can rot and smell.
- Washing the base with water – Liquids in the base can ruin the motor.
- Not drying parts fully before storing – Damp parts invite bacteria and mildew.
By avoiding these mistakes, you keep your blender working better and lasting longer.
Do You Need Special Cleaning Products?
For most cleanings, regular dish soap and warm water are enough. For tough stains or odors, baking soda and vinegar work well and are safe for food use. There’s no need for expensive or special cleaners unless your manufacturer recommends them.
If you want to use a cleaning pod or tablet, check that it’s approved for food appliances and rinse all parts thoroughly after use.
When To Replace Blender Parts
Even with good care, some parts wear out over time. Replace parts if you notice:
- Cracked or cloudy cup that won’t come clean.
- Dull or rusted blades that blend less effectively.
- Loose or cracked gasket leading to leaks.
- Damaged lid that no longer seals.
Replacement parts are available from the Ninja website and other retailers. Using fresh parts keeps your blender safe and effective.
Are Ninja Mini Blenders Easy To Clean Compared To Other Blenders?
Compared to larger blenders, the Ninja Mini Blender is easier to clean because:
- Fewer parts to disassemble.
- Smaller cup fits easily in the sink or dishwasher.
- Blade assembly is usually removable, making deep cleaning simpler.
Some mini blenders have fixed blades, making cleaning tricky. The Ninja Mini Blender’s removable blade is a big advantage. However, the small size means food can get stuck more easily, so quick cleaning after each use is essential.
Credit: www.homesandgardens.com
Quick Reference: Cleaning Ninja Mini Blender Vs. Other Mini Blenders
Here’s a comparison of the Ninja Mini Blender and two popular competitors:
| Feature | Ninja Mini Blender | NutriBullet Go | Magic Bullet Mini |
|---|---|---|---|
| Removable Blades | Yes | No | Yes |
| Dishwasher Safe Parts | Yes | Yes | Yes |
| Gasket Cleaning | Removable | Fixed | Removable |
| Base Cleaning | Wipe only | Wipe only | Wipe only |
| Self-Cleaning Option | Yes (blend & rinse) | Yes | No |
This makes the Ninja Mini Blender a good choice for people who want easy, thorough cleaning.
Eco-friendly Cleaning Tips
For those who care about the environment, you can clean your Ninja Mini Blender with natural cleaners. Baking soda, vinegar, and lemon juice all work well and are safe for most blender parts. Avoid using too much hot water or running half-empty dishwasher loads to save energy and water.
Where To Find More Help
If you’re unsure about how to take apart your blender or need replacement parts, check the official Ninja website. They have cleaning guides and parts for most models. You can also find helpful tips and user experiences on forums and YouTube.
For official care and cleaning advice, visit the Ninja Kitchen Support.
Frequently Asked Questions

Credit: www.amazon.com
What Should I Do If My Ninja Mini Blender Smells Bad After Cleaning?
If bad smells remain, soak the cup, blade, and lid in a vinegar and water solution (1:3 ratio) for 15–30 minutes. Clean under the gasket if possible. Rinse thoroughly and air dry. This removes most odors.
Is It Safe To Put All Ninja Mini Blender Parts In The Dishwasher?
The cup, lid, and blade are usually top-rack dishwasher safe. Never put the motor base in the dishwasher. Always check your model’s instructions to be sure.
Can I Use Bleach Or Harsh Chemicals To Clean The Blender?
No, avoid bleach or strong chemicals. They can damage the plastic and rubber parts and may leave harmful residues. Stick with dish soap, vinegar, and baking soda.
How Do I Clean Stuck-on Food Under The Blade?
Fill the cup with warm, soapy water. Let it soak for 10–20 minutes. Use a small brush or toothbrush to scrub under and around the blade. For tough build-up, a baking soda paste helps.
How Often Should I Do A Deep Clean On My Ninja Mini Blender?
A deep clean every 2–4 weeks is best, depending on how often you use it and what you blend. For sticky or protein-heavy drinks, clean more often to avoid residue and odors.
Keeping your Ninja Mini Blender clean does not have to be a chore. With these steps, you can enjoy fresh-tasting drinks, prevent odors, and help your blender last for years. Just a few minutes after each use—and a deeper clean now and then—makes all the difference for your kitchen and your health.