How To Clean Ninja Professional Blender: Quick & Easy Steps
If you own a Ninja Professional Blender, you know how much it simplifies your kitchen tasks—from making smoothies to blending soups. But with all those powerful blades and sturdy pitchers, cleaning it can sometimes feel challenging. A clean blender is not just about looks; it’s essential for safe, healthy food preparation and keeping your blender running smoothly. Many people make mistakes like missing hidden residue or damaging seals by cleaning the wrong way. In this guide, you’ll learn practical, easy-to-follow steps for cleaning your Ninja Professional Blender thoroughly and efficiently, whether you use it daily or once a week. You’ll also discover the best cleaning tools, solutions, and tricks most people overlook, ensuring your blender stays in top condition for years.
Why Proper Cleaning Matters
A blender is in direct contact with food, which means leftover particles can lead to bacterial growth and unpleasant odors. Over time, even small amounts of residue can attract mold, especially in the gasket and under the blades. This not only affects the taste and safety of your food but can also shorten your blender’s life.
The Ninja Professional Blender is designed with strong, sharp blades and a sealed base, so cleaning it incorrectly can dull the blades or damage the motor. According to a Consumer Reports study, blenders are among the top five kitchen appliances most likely to cause foodborne illness when not cleaned properly.
Proper cleaning isn’t just about making it look good—it protects your investment and your health.
Understanding The Ninja Professional Blender’s Parts
Before you start cleaning, it’s important to know the different parts of your Ninja Professional Blender. Here’s a breakdown:
| Part | Material | Removable? | Dishwasher Safe? |
|---|---|---|---|
| Pitcher/Jar | BPA-free plastic or glass | Yes | Yes (top rack) |
| Blade Assembly | Stainless Steel | Yes | Yes (top rack) |
| Lid & Spout | BPA-free plastic | Yes | Yes (top rack) |
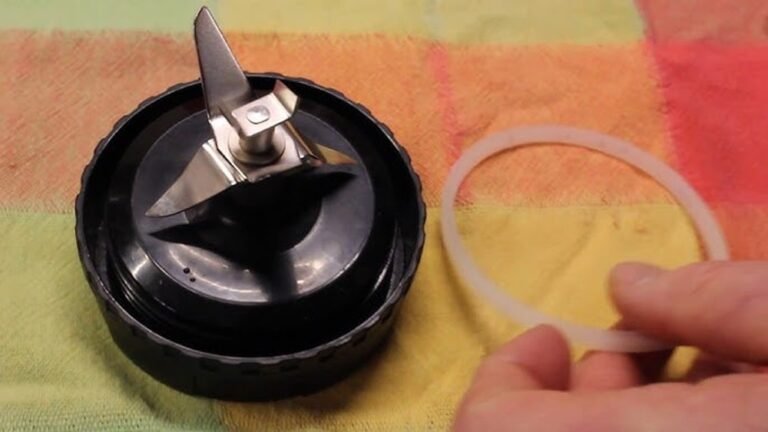
| Gasket/Seal | Rubber/Silicone | Yes | No (hand wash only) |
| Base/Motor | Metal & Plastic | No | No (wipe only) |
Knowing which parts are removable and dishwasher safe prevents accidental damage. For example, the gasket needs gentle care and should never go in a dishwasher.

Credit: www.costco.com
What You Need: Essential Cleaning Supplies
Gathering the right supplies ahead of time makes cleaning faster and more effective. Here’s what you’ll need:
- Mild dish soap (avoid harsh or scented varieties)
- Warm water
- A soft sponge or microfiber cloth
- A small brush (like a toothbrush)
- A bottle brush (for deep cleaning the pitcher)
- White vinegar or baking soda (for tough stains or odors)
- Paper towels or a clean dish towel
- Gloves (optional, for handling sharp blades)
Avoid using abrasive cleaners or steel wool, which can scratch the pitcher and dull the blades.
Step-by-step: How To Clean Your Ninja Professional Blender
Let’s walk through each step to get your blender spotless. This method works for daily cleaning and deeper, weekly sessions.
1. Unplug And Disassemble
Safety comes first. Always unplug the blender before cleaning. Remove the pitcher from the base. Take off the lid and separate all removable parts, including the blade assembly and gasket if possible. Handle the blades carefully—they’re extremely sharp.
2. Pre-rinse Right Away
Right after using the blender, give it a quick rinse with warm water. This stops food from drying and sticking. Swirl water inside the pitcher and pour it out. If you can’t clean immediately, fill the pitcher halfway with water and a drop of dish soap, then let it soak.
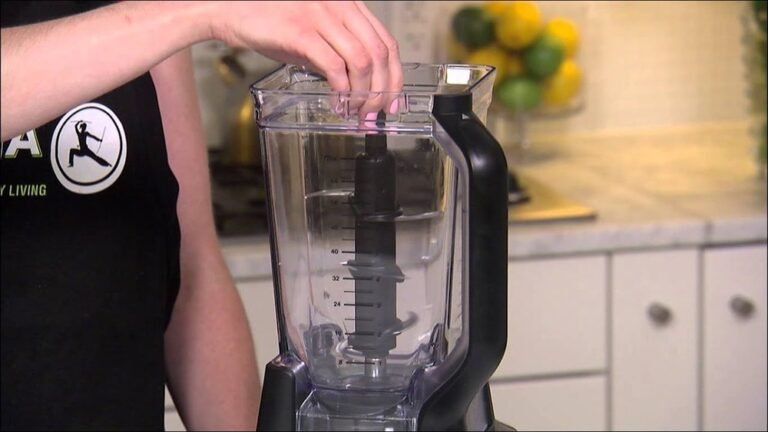
3. Quick Clean Method (for Everyday Use)
This is the fastest way to keep your blender fresh after each use:
- Fill the pitcher halfway with warm water.
- Add a few drops of dish soap.
- Reassemble the lid and place the pitcher on the base.
- Plug in and run the blender for 30-60 seconds.
- Pour out the soapy water, rinse with clean water, and air dry.
This “self-clean” method removes most residue from the blades and pitcher. It’s especially useful for smoothies or drinks.
4. Deep Clean Method (weekly Or After Heavy Use)
For sticky, oily, or stubborn messes, a deeper clean is needed:
- Disassemble all parts, including removing the blade assembly.
- Wash each piece with warm soapy water using a soft sponge.
- Use a bottle brush to reach corners of the pitcher and a toothbrush for the gasket and around blades.
- For stuck-on food, sprinkle baking soda on the sponge or fill the pitcher with a mix of water and white vinegar (1: 1 ratio), let soak for 15 minutes, then scrub.
- Rinse thoroughly to remove all soap and baking soda.
- Dry all parts completely before reassembling.
Tip: Always wash the gasket by hand to avoid damage or warping.
5. Cleaning The Blade Assembly
Blender blades are sharp and can hold onto small food bits. Here’s how to clean them safely:
- Remove the blade assembly carefully.
- Use a brush, not your fingers, to scrub around the blades.
- Pay attention to the bottom and between blades.
- For tough buildup, soak the blades in warm soapy water for 10-15 minutes before scrubbing.
- Rinse and dry thoroughly—blades can rust if left wet.
Pro insight: Most people forget to clean under the blade collar. Food can hide here, so take an extra moment to check.
6. Washing The Lid And Gasket
Lids often have hidden crevices, especially around the pour spout.
- Remove the gasket if possible.
- Wash the lid with a sponge, focusing on all corners.
- Scrub the gasket with a small brush and soapy water, then rinse and dry.
- Make sure both pieces are fully dry before reassembling to prevent mold.
Non-obvious tip: If the gasket smells bad, leave it in a vinegar-water solution for 15 minutes.
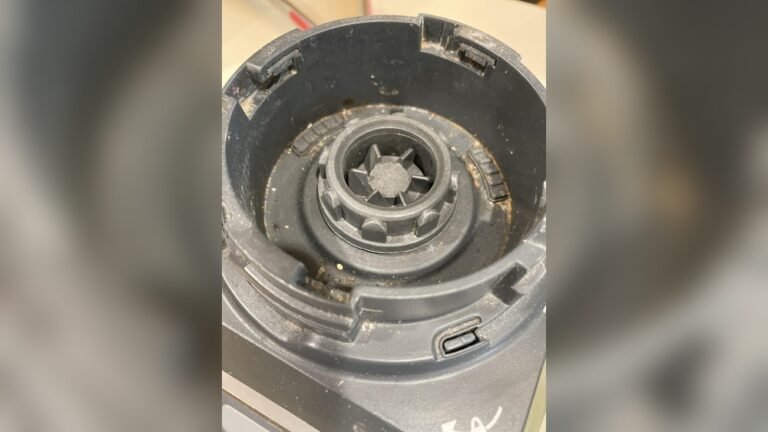
7. Wiping Down The Base
Never submerge the blender base in water. Instead:
- Unplug the base.
- Use a damp (not wet) cloth with a drop of mild soap.
- Wipe the exterior, especially around the buttons and under the pitcher.
- Dry with a clean towel.
- For sticky spills, use a cotton swab for small crevices.
If liquid gets into the base, unplug it immediately and let it air dry for at least 24 hours before using.
8. Drying And Reassembling
After cleaning, allow all parts to air dry on a rack or towel. Make sure every piece is completely dry—especially the blades and gasket. Reassemble the blender only when you’re sure there’s no moisture left. This prevents bacteria growth and keeps parts from rusting.
How Often Should You Clean Your Ninja Professional Blender?
- After every use: Quick clean method with soap and water.
- Weekly: Deep clean, especially if you use the blender for sticky foods or dairy.
- Monthly: Remove and clean the gasket and blade assembly thoroughly.
- As needed: If you notice odors, stains, or stuck-on residue, do a deep clean right away.
Frequent cleaning keeps your blender looking new and working efficiently.
Common Cleaning Mistakes To Avoid
Even experienced users sometimes make mistakes that can damage their blender or leave it less than clean. Here are some common pitfalls:
- Leaving the base wet: This can cause electrical problems or mold.
- Using abrasive scrubbers: These scratch plastic and dull blades.
- Not removing the gasket: Residue and mold can build up in hidden spots.
- Overlooking the spout and under the blade collar: Food can hide here and spoil.
- Dishwashing the gasket: High heat can warp or damage the seal, leading to leaks.
Always follow the manufacturer’s cleaning instructions and check the manual for your specific model.

Credit: www.youtube.com
Best Cleaning Solutions And Alternatives
Most of the time, dish soap and warm water are enough. But for tough stains, smells, or cloudy plastic, try these options:
- White vinegar: Mix equal parts vinegar and water, soak, then rinse. Great for odors.
- Baking soda: Sprinkle on a sponge or make a paste with water for scrubbing stubborn spots.
- Lemon juice: Run the blender with water and lemon juice to freshen and deodorize.
Avoid bleach or harsh chemicals—they can damage plastic and leave unsafe residues.
Stain And Odor Removal Guide
Blenders sometimes develop stains from berries, turmeric, or coffee, and odors from garlic or onions. Here’s how to tackle them:
| Problem | Solution | Time Needed |
|---|---|---|
| Red/purple stains | Soak in vinegar or lemon juice | 30 minutes |
| Cloudy plastic | Baking soda paste, scrub gently | 10 minutes |
| Strong odors | Run with water + lemon juice | 60 seconds blend, 10 min soak |
| Oily residue | Hot water with extra dish soap | 15 minutes soak |
Always rinse thoroughly to remove any cleaning agents before your next use.
Storage Tips To Keep Your Blender Clean
How you store your blender can affect how clean it stays:
- Store with the lid off to prevent moisture buildup.
- Keep the base in a dry, cool area.
- If storing for a long time, wrap the blade assembly separately.
- Never store the blender when it’s wet—this invites mold.
A dry, well-ventilated spot is best for long-term storage.
Troubleshooting: When Your Blender Still Smells Or Looks Dirty
If you’ve cleaned your Ninja Professional Blender thoroughly but it still smells or looks dirty, try these advanced tips:
- Check inside the blade assembly—sometimes food gets trapped inside.
- Remove and inspect the gasket for any mold or stains.
- Soak all removable parts overnight in a mix of water and vinegar.
- For persistent cloudiness, gently scrub with a non-scratch sponge and baking soda.
- Replace old or damaged gaskets or blades if they remain stained after cleaning.
If you see cracks or black spots that won’t clean off, it may be time to replace certain parts for hygiene.
How Cleaning Affects Blender Performance
A clean blender doesn’t just look better—it works better too. Food residue can dull blades, reduce blending efficiency, and even cause leaks if gaskets are blocked. According to Ninja’s official site, regular cleaning can extend a blender’s life by up to 30% compared to neglected models.
When the pitcher is clear and blades are sharp, you’ll notice smoother blends and quieter operation. Keeping buttons and the base clean also prevents electrical problems and sticky controls.
Comparing Cleaning Methods: Manual Vs. Dishwasher
Is it better to wash your Ninja Professional Blender by hand or use the dishwasher? Here’s a quick comparison:
| Method | Pros | Cons |
|---|---|---|
| Hand Washing | Gentle, reaches all areas, prevents warping | Takes more time, risk of cuts if careless |
| Dishwasher (top rack only) | Convenient, less effort | High heat can warp lids/gaskets, may miss crevices |
For best results, hand-wash the gasket and blade assembly. The pitcher and lid can go in the dishwasher, but always use the top rack and avoid high-heat drying cycles.
Safety Reminders When Cleaning
- Always unplug before cleaning the base.
- Handle blades with care—use a brush, not fingers.
- Never submerge the motor base.
- Allow all parts to dry fully before using or storing.
- Replace any part that shows cracks, black spots, or stubborn mold.
A little caution goes a long way in preventing injury and extending your blender’s life.
Signs It’s Time To Replace Blender Parts
Even with the best care, some parts will eventually wear out. Replace parts if you notice:
- Cracked pitcher or lid
- Warped or loose gasket
- Rusty or dull blades
- Persistent odors or stains that don’t wash out
- Leaks from the base
Replacement parts are available through the official Ninja website or trusted retailers.
Eco-friendly Cleaning Tips
If you want to reduce your environmental impact, try these green cleaning ideas:
- Use baking soda and vinegar instead of chemical cleaners.
- Clean with a microfiber cloth instead of disposable paper towels.
- Run the “self-clean” cycle with leftover lemon peels for a natural freshener.
- Use cold water when possible to save energy.
These simple changes keep your blender and the planet cleaner.
When To Seek Professional Help
If your Ninja Professional Blender has an electrical problem, a stuck blade, or a leak that won’t go away, don’t try to fix it yourself. Contact Ninja customer service for help. Attempting repairs on the motor or wiring can be dangerous and may void your warranty.
For more guidance, visit the official Ninja Kitchen Support site.

Credit: www.sharkninja.com
Frequently Asked Questions
How Do I Remove Tough Stains From My Ninja Professional Blender Pitcher?
Fill the pitcher with equal parts white vinegar and water. Let it soak for 30 minutes, then scrub with a bottle brush and rinse. For stubborn stains, use a baking soda paste and a soft sponge.
Is It Safe To Put Ninja Blender Parts In The Dishwasher?
Yes, most pitcher and lid parts are dishwasher safe (top rack only). However, always hand wash the gasket and blade assembly to prevent damage.
My Blender Smells Bad Even After Cleaning. What Should I Do?
Try running the blender with warm water and lemon juice for 60 seconds, then let it soak for 10 minutes. If odors persist, soak removable parts in a vinegar solution overnight.
How Often Should I Deep Clean My Ninja Professional Blender?
Deep clean your blender at least once a week, or more often if you use it daily for sticky or dairy-based recipes.
Can I Use Bleach Or Strong Chemicals To Clean My Blender?
No, avoid bleach or harsh chemicals. They can damage plastic parts and leave unsafe residues. Stick to mild dish soap, baking soda, or vinegar for safe, effective cleaning.
A clean Ninja Professional Blender means better taste, longer life, and safer meals. With these steps and tips, you can keep your blender spotless and ready for any recipe. Happy blending!