How To Make A Latte With An Immersion Blender: Easy Guide
If you love lattes but don’t have a fancy espresso machine or milk frother, there’s good news. You can make a creamy, delicious latte at home using a tool you might already own: the immersion blender. This kitchen gadget, also called a stick blender or hand blender, can turn plain milk into smooth, foamy goodness. Whether you’re a coffee lover wanting to save money, or you simply enjoy experimenting with drinks, this guide will show you how to craft a café-style latte in your own kitchen—with just an immersion blender.
In this article, you’ll learn every step: from choosing the right coffee and milk to blending technique and latte art basics. You’ll discover the science behind milk frothing, common mistakes to avoid, and how to adjust your latte to match your taste. By the end, you’ll have the confidence and know-how to make a latte that rivals your local coffee shop—no expensive machines needed.
What Is A Latte?
A latte is a coffee drink made with espresso and steamed milk, topped with a thin layer of foam. The word “latte” comes from the Italian “caffè latte,” meaning “milk coffee.” It is smoother and creamier than a regular coffee, with a balanced taste that combines strong coffee flavor and sweet, silky milk.
The classic latte is served in an 8 to 12-ounce cup or glass. The typical ratio is one part espresso to two or three parts steamed milk, plus a small amount of foam. The drink can be enjoyed plain or flavored with syrups like vanilla, caramel, or hazelnut.
Lattes are popular worldwide for their mellow taste and comforting texture. They are also the base for many specialty drinks, from chai lattes to matcha lattes. Making a latte at home lets you control the ingredients, sugar, and flavor.
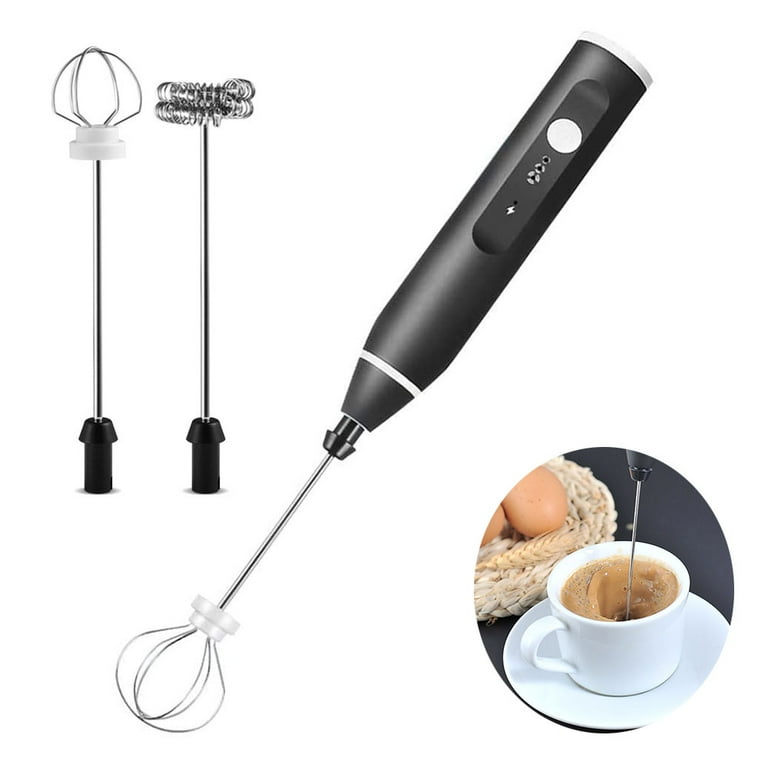
Why Use An Immersion Blender For Lattes?
Most coffee shops use steam wands to froth milk, but these are expensive and require skill. At home, some people use small electric milk frothers or a French press. But the immersion blender is a powerful, flexible tool that can create microfoam similar to what you get at a café. Here’s why it works:
- High speed blades: The spinning blades quickly mix air into the milk, creating tiny bubbles (microfoam) for a silky texture.
- Easy to clean: Most immersion blenders have detachable parts that rinse clean in seconds.
- No special pitcher needed: You can froth milk right in the pot or a tall mug.
- Multitasking: You can use the same tool for soups, smoothies, and more.
Many home cooks miss this trick, but an immersion blender can give you better foam than shaking milk in a jar or whisking by hand. It’s also faster than many other methods.
What You Need: Ingredients And Tools
Let’s gather everything you need to make a latte with an immersion blender. Here’s a simple list for one 12-ounce latte.
Ingredients
- Freshly brewed coffee: 2 to 3 ounces (preferably espresso or strong coffee)
- Milk: 6 to 8 ounces (whole milk gives the creamiest foam, but 2%, skim, oat, or almond milk also work)
- Sweetener (optional): Sugar, honey, or syrup
- Flavoring (optional): Vanilla extract, cinnamon, cocoa powder
Tools
- Immersion blender (with a blending cup or tall container)
- Small saucepan (for heating milk)
- Coffee maker: Espresso machine, Moka pot, AeroPress, or strong drip coffee maker
- Spoon (for holding back foam and stirring)
- Latte cup or mug (8 to 12 oz)
A kitchen thermometer is helpful but not required. If you like latte art, a small milk pitcher can help pour better designs.
Choosing The Right Coffee
A great latte starts with great coffee. While the traditional method uses espresso, you can use other types of strong coffee if you don’t have an espresso machine.
Espresso
Espresso is made by forcing hot water through finely ground coffee under pressure. It is rich, strong, and has a layer of crema (golden foam). If you have an espresso machine, use it.
Alternatives To Espresso
If you don’t own an espresso machine, try these methods:
- Moka pot: Makes strong, espresso-like coffee on the stove.
- AeroPress: With a fine grind and less water, you can create a concentrated “espresso-style” shot.
- Strong drip coffee: Use double the normal amount of grounds for a stronger brew.
- French press: Not as concentrated, but works if it’s what you have.
No matter which method, freshly ground beans make a big difference. Choose a medium or dark roast for classic latte flavor.
Coffee Strength Comparison
Here’s a quick look at how various methods compare for latte-making:
| Method | Coffee Strength | Recommended Grind | Best For |
|---|---|---|---|
| Espresso Machine | Very strong | Fine | Café-style lattes |
| Moka Pot | Strong | Fine-medium | Home espresso alternative |
| AeroPress | Medium-strong | Fine | Quick espresso-style shots |
| Drip Coffee | Medium | Medium | Convenience |
If you want the best foam and flavor, aim for the strongest coffee your equipment allows.
Picking The Best Milk For Frothing
Milk is just as important as coffee in a latte. The type of milk you use affects the taste, texture, and how well it foams.
Dairy Milk
- Whole milk: Froths best and gives a rich, creamy taste.
- 2% (reduced fat): Creates good foam, slightly lighter in flavor.
- Skim milk: Makes the largest bubbles and stiffest foam but is less creamy.
Whole milk is the top choice for smooth microfoam, thanks to its balanced fat and protein.
Plant-based Milks
Many people use oat milk, almond milk, or soy milk. Not all plant milks foam equally well.
- Oat milk: Froths well (especially “barista” versions), sweet taste.
- Soy milk: Good foam, but can curdle if overheated or mixed with acidic coffee.
- Almond milk: Tends to make larger bubbles, can separate.
- Coconut milk: Creamy, but foam is less stable.
If you use non-dairy milk, look for types labeled “barista” or “for frothing. ” They contain extra proteins or stabilizers for better foam.
Milk Frothing Performance
Here’s how common types compare for homemade lattes:
| Milk Type | Foam Texture | Taste in Latte | Best Use |
|---|---|---|---|
| Whole Milk | Silky, creamy microfoam | Rich, sweet | Classic lattes |
| 2% Milk | Good microfoam | Smooth, lighter | Lower fat option |
| Oat Milk (Barista) | Silky, dense | Sweet, mild | Vegan/dairy-free |
| Soy Milk | Decent foam | Nutty, beany | Dairy-free |
| Almond Milk | Bigger bubbles | Nutty, thin | Light, dairy-free |
If you’re new, start with whole or 2% milk for best results.
The Science Of Milk Frothing
When you heat and froth milk, you’re creating a foam made of tiny air bubbles surrounded by protein and fat. The goal is to make microfoam—smooth, shiny, and creamy, not large and bubbly.
How Frothing Works
- Heat unfolds milk proteins, which then trap air bubbles as you blend.
- Fat gives a creamy mouthfeel, but too much can break up the foam.
- High-speed blending (like with an immersion blender) whips air in quickly for a dense foam.
The most common mistake is overheating milk. Over 160°F (71°C), milk proteins break down, and the foam collapses or tastes “cooked. ” Aim for 140–150°F (60–65°C) for sweet, creamy results.
Step-by-step: How To Make A Latte With An Immersion Blender
Here’s how to make a classic latte at home. These steps work for dairy or plant-based milk.
1. Brew Your Coffee
Brew 2 to 3 ounces (about 1/4 to 1/3 cup) of strong coffee or espresso. Pour it into your latte cup.
Tip: If you want a sweeter latte, add sugar or syrup to the hot coffee so it dissolves.
2. Measure And Heat Your Milk
Pour 6 to 8 ounces (about 3/4 to 1 cup) of milk into a small saucepan. Heat over medium-low heat until steaming but not boiling. If you have a thermometer, aim for 140–150°F (60–65°C).
- No thermometer? Watch for small bubbles at the edge and steam rising, but don’t let it boil.
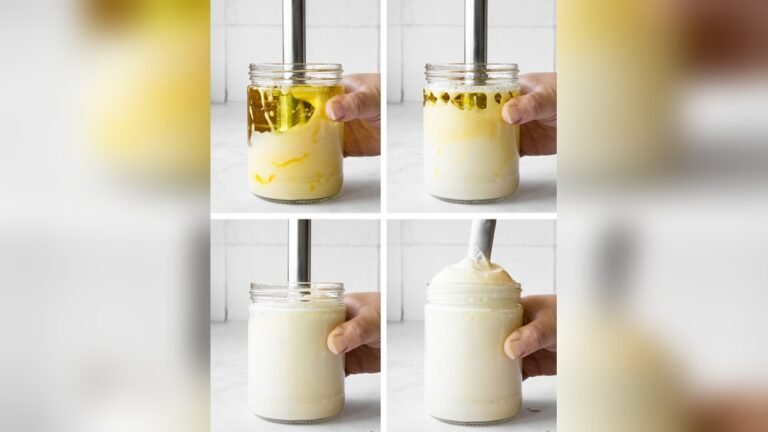
3. Froth The Milk With An Immersion Blender
- Pour the hot milk into a tall, narrow container (like the blending cup that came with your blender).
- Submerge the immersion blender just below the surface of the milk.
- Blend on low, then high, for 15–30 seconds. Move the blender up and down gently to mix air in evenly.
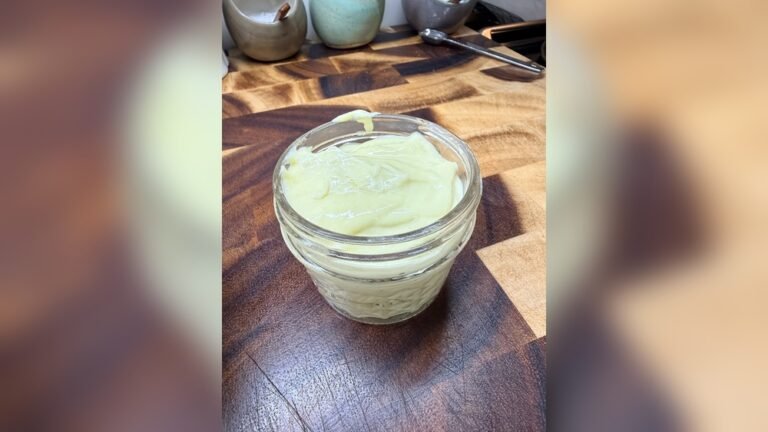
You’ll see the milk double in size and become thick and foamy. Stop when you have a silky, pourable foam with tiny bubbles.
*Pro tip*: If your immersion blender is very powerful, blend in short bursts to avoid splattering.
4. Combine Coffee And Frothed Milk
- Hold back the foam with a spoon and pour most of the steamed milk into your coffee.
- Spoon the foam on top for a classic latte “cap.”
- Swirl or tap the cup gently to blend flavors.
5. Add Finishing Touches
Add a sprinkle of cinnamon, cocoa powder, or a drop of vanilla if you like. Sip and enjoy!
Practical Tips For Better Lattes
Even a simple process has tricks to make it easier and tastier. Here are some practical tips:
- Use fresh, cold milk for best foam. Old milk or milk that’s been reheated many times won’t foam well.
- Don’t overheat the milk. Too hot, and it will taste burnt and lose sweetness.
- Clean the blender right away. Milk can dry on blades and be hard to remove.
- Use a tall container for blending to prevent spills and get thicker foam.
- Pour milk slowly for better layering and smoother texture.
Common Mistakes (and How To Avoid Them)
Many beginners run into the same problems. Here’s what to watch out for:
- Bubbly foam, not creamy: Blending too long or using the wrong milk creates big bubbles. Use whole milk and blend just until silky.
- Milk splattering: The container is too shallow or you started blending at high speed. Use a deeper cup and start slow.
- Flat latte, no foam: Old or ultra-pasteurized milk, or milk was too hot/cold. Use fresh milk and heat to the right temperature.
- Coffee tastes weak: Use a stronger brew, or less milk for a more robust taste.
How To Make A Flavored Latte
Want something special? Add flavors to your latte:
- Vanilla: Add 1/4 teaspoon vanilla extract to the milk before heating.
- Caramel: Stir caramel syrup into the coffee before adding milk.
- Mocha: Mix 1 teaspoon cocoa powder and sugar into the coffee.
- Chai: Steep 1 chai tea bag in hot milk for 5 minutes, then froth and combine with coffee.
Adjust sweetness to your taste.
Latte Art Basics With An Immersion Blender
Latte art isn’t just for baristas. You can try simple designs at home. While an immersion blender can’t make the ultra-fine microfoam of a professional steam wand, you can still pour a heart or “tulip” with practice.
How to start:
- Swirl the milk to blend foam and liquid.
- Pour steadily from a little height to start, then lower the pitcher as you finish.
- Move your hand gently for a heart shape, or wiggle for a leaf.
Don’t be discouraged if it’s not perfect! Even simple “free pour” designs look impressive.
Cleaning And Caring For Your Immersion Blender
Keeping your equipment clean is key for tasty lattes and long-lasting tools.
- Unplug the blender before cleaning.
- Rinse the blending shaft under hot water right after use.
- For sticky milk, blend a cup of hot water and soap for a few seconds, then rinse.
- Dry all parts before storing.
Never submerge the motor part in water.
Comparing Latte-making Tools
How does the immersion blender compare to other home frothing options? Here’s a quick look:
| Tool | Foam Quality | Ease of Use | Cleaning | Cost |
|---|---|---|---|---|
| Immersion Blender | Smooth, thick | Easy | Easy | Low-medium |
| French Press | Good, sometimes bubbly | Simple | Moderate | Low |
| Handheld Frother | Light, airy | Very easy | Easy | Low |
| Steam Wand | Professional, silky | Harder (needs practice) | Moderate | High |
The immersion blender is a great balance between quality, price, and convenience for home baristas.
Customizing Your Latte
The best part of making lattes at home is adjusting everything to your taste. Here’s how you can experiment:
- Stronger latte: Use less milk or more coffee.
- Sweeter latte: Add sugar or syrup before pouring in the milk.
- Iced latte: Froth cold milk, pour over ice with espresso.
- Dairy-free: Try oat or almond milk.
You can even use decaf coffee or herbal alternatives for a caffeine-free treat.

Credit: www.amazon.com
Troubleshooting Your Homemade Latte
Still not getting the results you want? Here’s a quick troubleshooting guide:
- Foam separates or disappears fast: Milk was overheated or under-frothed. Try a lower temperature and blend slightly longer.
- Latte tastes bland: Use fresh, high-quality coffee beans and grind just before brewing.
- Foam is too stiff: You may be using skim milk or over-blending. Try whole milk and blend less.
- Milk tastes “cooked”: Lower the heat, and stop frothing as soon as you reach temperature.
Non-obvious Insights Most Beginners Miss
- The fat-to-protein ratio in milk matters more than you think. Whole milk gives you silky microfoam because it has just enough fat to keep bubbles stable, but not so much that it breaks down. Skim milk foams easily, but the foam is stiff and dries out fast.
- Letting milk rest for 10–15 seconds after blending helps stabilize the foam. The bubbles settle, and the texture becomes smoother. Most people rush to pour, but this small wait makes a big difference.
- The shape of your container affects foam quality. A tall, narrow blending cup works much better than a wide bowl. It keeps the air and milk mixing in a tight space, making finer foam.
- Adding syrup or sugar before frothing can change how the foam forms. Some sweeteners (like honey) can make the foam less stable, while others (like simple syrup) blend in smoothly.
- The temperature of both coffee and milk matters. If your coffee is cold when you add hot milk, the foam can collapse. Try to keep both liquids warm for best results.
Health And Nutrition: What To Know
Lattes are a treat, but they can be made healthier:
- Whole milk lattes are higher in fat and calories. Using 2% or plant milk cuts calories.
- Sweetened syrups add sugar. Try spices or unsweetened flavors for fewer calories.
- Homemade lattes let you control portion size and ingredients, which helps with balanced eating.
A typical 12-ounce latte with whole milk has about 150–180 calories. Plant-based versions may be lower or higher, depending on the type.
Environmental And Cost Benefits
Making lattes at home is not just cheaper—it’s greener, too.
- No disposable cups or lids.
- Less energy used than a commercial espresso machine.
- Save money: The cost of one homemade latte is about one-tenth the price of a coffee shop drink.
You can use local, organic, or fair-trade ingredients to further reduce your impact.

Credit: www.amazon.com
Advanced Tips: Taking Your Latte To The Next Level
Ready to go beyond basics? Try these ideas:
- Infuse milk with flavors: Warm milk with cinnamon sticks, cardamom, or orange peel before frothing.
- Try “dry” vs “wet” lattes: Use more foam for a dry latte, or less foam for a wet latte.
- Layer your drink: Pour milk slowly to get a beautiful separation of coffee and foam.
- Use cold foam: Froth cold milk for iced lattes—a trend in modern cafés.
If you want to learn more about the science behind coffee and foam, check out Coffee Research for detailed studies.
Frequently Asked Questions
How Much Coffee Should I Use For A Homemade Latte?
For a standard 12-ounce latte, use 2 to 3 ounces of strong coffee or espresso. If you prefer a stronger taste, use less milk or more coffee. Adjust based on your preferred strength and the type of coffee maker you use.
Can I Use Cold Milk With An Immersion Blender For Iced Lattes?
Yes, you can use cold milk. Froth cold milk with your immersion blender until it’s foamy, then pour it over ice with your coffee. Cold foam is popular for iced drinks, but it will be less creamy than steamed milk.
What Is The Best Plant-based Milk For Lattes?
Oat milk (barista style) is the most popular non-dairy milk for lattes. It foams well and has a naturally sweet taste. Soy milk is also a good choice. Almond milk can work, but often makes larger bubbles.
Why Does My Milk Splatter When I Use The Immersion Blender?
Splattering happens if the container is too shallow or you start on high speed. Use a tall, narrow cup, submerge the blender before turning it on, and start at a low speed. Blend in short bursts to control foam.
Can I Make Latte Art With An Immersion Blender?
While the foam from an immersion blender is not as silky as a steam wand’s, you can still try simple latte art. Swirl the milk to mix foam and liquid, pour slowly, and practice basic shapes like a heart or dot.
Making a latte with an immersion blender is a practical, fun way to enjoy coffeehouse drinks at home. With a bit of practice and the right tips, you’ll discover how easy and rewarding it is to create your perfect cup—tailored to your taste and style.
Credit: www.walmart.com