How To Puree Soup With Immersion Blender: Easy Step-by-Step Guide
Pureeing soup with an immersion blender is one of the easiest ways to create smooth, creamy dishes at home. This simple kitchen tool can turn a chunky vegetable soup into a velvety puree in minutes, all without transferring hot liquids between pots and blenders.
Whether you’re looking to perfect classic tomato soup, make healthy purees for kids, or just speed up weeknight meals, learning to use an immersion blender will open up a new world of cooking convenience.
But while the process seems simple, there are important details that make a big difference in your results. From choosing the right soup base to understanding blending techniques and cleaning up safely, this guide covers every step. You’ll also learn smart tips, discover common mistakes to avoid, and find answers to questions most beginners miss.
Let’s dive in and master the art of pureeing soup with an immersion blender.
Why Use An Immersion Blender For Soup?
Immersion blenders—also called stick blenders or hand blenders—are designed to blend food directly in the cooking pot. Unlike countertop blenders, you don’t have to pour hot soup into another container, which saves time and reduces the risk of burns or spills. Here’s why many cooks prefer immersion blenders for pureeing soup:
- Convenience: Blend right in the pot where you cooked your soup.
- Easy to use and clean: Most models have detachable blades that rinse clean quickly.
- Control: You can blend as much or as little as you want, choosing between chunky or smooth textures.
- Space-saving: Immersion blenders are small and easy to store compared to large countertop models.
If you’ve ever tried to pour hot soup into a traditional blender and ended up with a mess, you’ll appreciate how much safer and simpler this tool is.
What You Need: Tools And Ingredients
To puree soup with an immersion blender, you’ll need just a few basic items. Here’s what to gather before you begin:
- Immersion blender: Any basic model works, but some have variable speeds for better control.
- Large pot or Dutch oven: Make sure it’s deep enough to prevent splashes.
- Soup ingredients: Vegetables, stock, seasonings, and any extras your recipe calls for.
- Ladle or large spoon: For stirring and serving.
- Heat-resistant measuring cup (optional): Useful for small batches or controlling texture.
If you’re new to making pureed soups, start with simple recipes like butternut squash, tomato, or potato-leek. These ingredients break down easily and result in creamy textures.
Step-by-step Guide: How To Puree Soup With An Immersion Blender
Pureeing soup isn’t just about pushing a button. To get perfect results, follow these steps:
1. Cook Your Soup Base
Start by sautéing aromatics like onions, garlic, or carrots in your pot. Add your main vegetables, broth, herbs, and spices. Simmer until everything is very soft—this usually takes 20 to 40 minutes depending on the ingredients. The softer the vegetables, the smoother your puree will be.
Pro tip: Don’t rush this step. Hard or undercooked vegetables will leave lumps, no matter how powerful your blender is.
2. Remove The Pot From Heat
Before blending, turn off the heat and let the soup cool for a few minutes. This reduces the chance of splattering hot liquid, which can burn your skin.
Non-obvious insight: Even if your blender is powerful, hot liquids expand when blended. Allowing the soup to cool slightly helps control splashes and keeps your kitchen cleaner.
3. Check The Liquid Level
Make sure the soup isn’t too thick or too watery. If it’s very thick, add a bit more broth or water. If it’s too thin, remove some liquid and set it aside. You can always add it back later.
4. Insert The Immersion Blender
Place the blender head fully under the surface of the soup. Always keep the blade submerged before turning it on—this prevents splattering.
5. Blend In Short Bursts
Press the power button and blend in short pulses, moving the blender slowly around the pot. Use an up-and-down motion for even blending. Work in sections until you reach your desired consistency.
Non-obvious insight: Start blending in the center, not at the edges. This keeps the soup from splashing up the sides and gives you better control.
6. Adjust Texture
Check the texture after 30 seconds. If it’s not smooth enough, keep blending. For chunkier soup, stop sooner. If the soup looks too thick, add more liquid a little at a time and blend again.
7. Taste And Finish
Once the soup is smooth, taste it. Adjust salt, pepper, or other seasonings as needed. Stir well and heat gently if it’s cooled too much.
8. Serve And Enjoy
Ladle the hot, creamy soup into bowls. Top with a drizzle of olive oil, a swirl of cream, or fresh herbs for extra flavor.
Common Mistakes To Avoid
Even though pureeing soup with an immersion blender is easy, there are mistakes that can ruin your results or make cleanup a headache.
- Blending while soup is boiling: Hot, bubbling soup can splatter badly. Always turn off the heat and let it settle before blending.
- Not submerging the blade: Starting the blender above the soup’s surface will spray hot liquid everywhere.
- Overfilling the pot: If your pot is too full, blending can cause spills. Leave at least 2 inches of space at the top.
- Forgetting to check texture: It’s easy to over-blend and make the soup too thin. Check the consistency often.
- Not cleaning the blender right away: Soup dries quickly on blades and is harder to clean later. Rinse the immersion blender as soon as you finish.

Credit: www.amazon.com
Comparing Immersion Blenders Vs. Countertop Blenders
Some cooks wonder if an immersion blender can really match the smooth results of a traditional blender. Here’s a quick look at how they compare:
| Feature | Immersion Blender | Countertop Blender |
|---|---|---|
| Convenience | Blend in the pot | Must transfer hot soup |
| Safety | Lower risk of splashes | Hot liquid can splatter |
| Texture control | Easy to leave chunks | Usually ultra-smooth |
| Cleanup | Quick rinse | Disassemble and wash jar |
| Storage | Compact | Bulky |
| Noise | Usually quieter | Louder |
Both tools have their place. If you want a perfectly silky texture, a countertop blender can sometimes do a better job. But for most soups, an immersion blender is more practical and less messy.
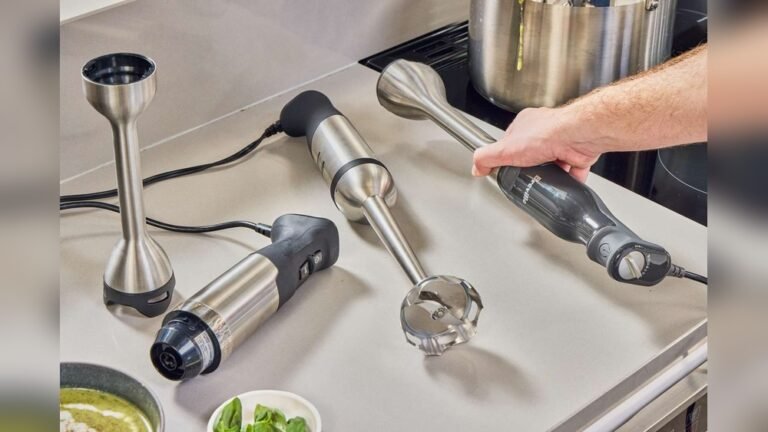
Choosing The Right Immersion Blender
Not all immersion blenders are the same. Here’s what to look for when choosing one for soup:
- Power: Look for at least 200 watts. More power means smoother results.
- Blade design: Multi-blade heads give better blending.
- Speed settings: Variable speed lets you control texture.
- Detachable shaft: Easier to clean and store.
- Grip comfort: Non-slip handles are safer, especially with wet hands.
If you plan to puree large batches or use the blender often, investing in a high-quality model will save time and effort. For occasional use, a basic model is usually enough.
Best Soups To Puree With An Immersion Blender
Some soups are especially well-suited for pureeing. They have soft vegetables and plenty of liquid, which create a creamy texture without much effort. Here are popular examples:
- Butternut squash soup: Naturally sweet and smooth when blended.
- Tomato soup: Roasted or fresh tomatoes make a rich, creamy base.
- Carrot-ginger soup: The immersion blender makes it silky and bright.
- Potato-leek soup: Turns velvety, perfect with a swirl of cream.
- Broccoli-cheese soup: The blender breaks down fibrous veggies for a smooth finish.
- Cauliflower soup: Blends easily for a light, healthy meal.
You can also blend bean soups, lentil soups, and even some chowders if you prefer a smoother texture.
Technique Tips For Best Results
Getting the most out of your immersion blender is about technique as much as equipment. Here’s how to get restaurant-quality soup at home:
- Use a tall pot: This reduces splattering and gives you more room to move the blender.
- Blend in batches for thick soups: If your soup is very dense, blend half at a time to avoid overworking the motor.
- Move the blender slowly: Rushing can create air bubbles or uneven texture.
- Pulse instead of holding the button: Short bursts give better control.
- Clean between batches: If pureeing multiple soups, rinse the blade to prevent flavor mixing.
Pro tip: For extra-smooth soup, strain it through a fine mesh sieve after blending. This removes any tiny bits left behind, giving you a professional finish.
Safety Precautions When Pureeing Hot Soup
Immersion blenders are safe when used correctly, but blending hot liquids always carries some risks. Here’s how to stay safe:
- Let soup cool slightly before blending. Five minutes is often enough.
- Keep the blade submerged at all times.
- Wear an apron and use a pot lid as a shield if you’re worried about splashes.
- Unplug the blender before cleaning to avoid accidents.
- Keep children away from the pot while blending.
Burns from hot soup are one of the most common kitchen injuries. Taking a few extra seconds to prepare can prevent painful accidents.
Cleaning And Maintaining Your Immersion Blender
A big advantage of immersion blenders is how easy they are to clean. Here’s the best way to keep yours in top shape:
- Unplug the blender before touching the blades.
- Detach the blending shaft if possible.
- Rinse under hot water immediately after use. Use a brush to remove stuck bits.
- Wash with soapy water if needed. Some parts are dishwasher-safe (check your manual).
- Dry completely before reassembling or storing.
Non-obvious insight: Never submerge the motor part in water. Only the detachable shaft and blades should get wet.
Regular cleaning prevents food buildup, which can dull blades or cause odors. With good care, a quality immersion blender can last for years.
When To Puree Soup Vs. Leave It Chunky
Not every soup is better pureed. Understanding when to blend and when to leave some texture can transform your cooking.
Puree When:
- You want a creamy, uniform texture (e.g., bisques, pureed vegetable soups).
- The recipe includes fibrous or tough vegetables that are hard to chew.
- You’re cooking for children or people who prefer smooth foods.
Leave Chunky When:
- The soup features distinct ingredients (e.g., minestrone, chicken noodle).
- Texture is important for flavor or visual appeal.
- You want a mix of smooth base with some pieces (blend half the soup, then mix).
Pro tip: You can always blend part of the soup and leave some chunks for the best of both worlds.
Pureed Soup Texture: What To Expect
The texture you get depends on several factors: soup ingredients, how long you blend, and the power of your immersion blender. Here’s a general guide:
| Texture Level | Blending Time | Result |
|---|---|---|
| Chunky | 10-20 seconds | Some pieces remain, thick base |
| Semi-smooth | 30-40 seconds | Mostly smooth, few small bits |
| Ultra-smooth | 1-2 minutes | Completely creamy, no pieces |
If your soup feels grainy, keep blending or add more liquid. Some vegetables (like cauliflower) may need extra time for a truly silky result.
Enhancing Flavor After Blending
Blending brings out flavors, but it can also mute some seasonings. After pureeing, taste and adjust:
- Salt and pepper: Essential for brightening flavors.
- Acid: Add a splash of lemon juice or vinegar to lift the taste.
- Fresh herbs: Stir in after blending for a burst of aroma.
- Cream or coconut milk: Adds richness and smoothness.
Non-obvious insight: Pureed soups often need more seasoning than chunky ones. Always taste after blending and adjust before serving.
Creative Pureed Soup Ideas
Once you master basic soups, try these creative variations with your immersion blender:
- Roasted pepper and tomato soup: Roast vegetables first for a smoky flavor.
- Sweet potato and apple soup: Blend cooked sweet potatoes with tart apples for a sweet-savory mix.
- Spiced pumpkin soup: Add curry powder or ginger for warmth.
- Green pea and mint soup: Fresh and light, perfect for spring.
- White bean and rosemary soup: Hearty and filling, blends into a creamy texture.
Experimenting with spices, toppings, and mix-ins keeps pureed soups interesting all year long.
Credit: cookfasteatwell.com
Using An Immersion Blender For Other Kitchen Tasks
The immersion blender is a versatile tool. Besides soup, you can use it for:
- Smoothies: Blend fruit and yogurt right in your glass.
- Sauces: Puree tomato sauce, pesto, or gravy.
- Baby food: Make healthy purees from cooked fruits and veggies.
- Whipped cream: Some models have attachments for whipping.
- Hummus or dips: Blend chickpeas, beans, or avocado for spreads.
Most immersion blenders come with a cup or beaker for small jobs, making cleanup even faster.
Troubleshooting: Fixing Common Pureed Soup Problems
Even with the best technique, things can go wrong. Here’s how to solve common issues:
- Soup is too thin: Simmer uncovered to reduce, or add cooked potatoes or beans and blend again.
- Soup is too thick: Add more broth, milk, or water a little at a time while blending.
- Soup is stringy or fibrous: Blend longer, or strain through a sieve.
- Soup tastes bland: Add salt, acid (lemon or vinegar), or a pinch of sugar to balance flavors.
- Color is dull: Stir in fresh herbs, cream, or a drizzle of oil for visual appeal.
If the texture isn’t right after blending, don’t give up. Small adjustments can turn an average soup into something special.
Caring For Your Immersion Blender Long-term
A well-maintained immersion blender lasts for years. Here’s how to keep yours working smoothly:
- Check the cord and plug regularly for wear.
- Sharpen or replace blades if they get dull (some models allow this).
- Store in a dry place to avoid rust.
- Follow manufacturer’s instructions for cleaning and maintenance.
A small investment of time in care will keep your blender ready for every soup season.
Nutritional Benefits Of Pureed Soups
Pureed soups aren’t just delicious—they can also be very healthy. Blending vegetables breaks down fibers, making nutrients easier to digest. Here are some benefits:
- High in vitamins and minerals: Especially vitamin A, C, and potassium from vegetables.
- Low in fat: If you skip cream or butter, most pureed soups are naturally low-calorie.
- Easy to digest: Great for kids, elderly, or anyone with digestive issues.
- Versatile for special diets: Simple to make vegan, gluten-free, or dairy-free.
Pro tip: Add beans or lentils before blending for extra protein and fiber without changing the smooth texture.
According to the Academy of Nutrition and Dietetics, pureed vegetable soups can be a cost-effective way to eat more vegetables and improve your overall diet.
Immersion Blender Safety And Kitchen Efficiency
Using an immersion blender not only makes your cooking safer but also improves kitchen efficiency. Here’s how:
- Less dishwashing: Fewer pots and containers to clean.
- Faster meal prep: Blend and serve directly from the cooking pot.
- Better portion control: Puree as much or as little as you want.
For busy families or anyone who cooks often, these small time savings add up.
Immersion Blender Comparison: What Features Matter?
If you’re shopping for a new immersion blender, it helps to compare key features side by side.
| Model | Power (Watts) | Speed Settings | Price Range (USD) | Best For |
|---|---|---|---|---|
| Basic | 200-250 | 1-2 | 20-30 | Occasional use |
| Mid-range | 250-350 | 2-5 | 40-80 | Regular soups, sauces |
| Professional | 400+ | Variable | 100-200 | Frequent heavy use |
More expensive models may include extra attachments, such as whisks or chopping bowls. Choose based on your cooking style and how often you’ll use the blender.
Real-life Example: Making Classic Butternut Squash Soup
Let’s walk through pureeing a classic soup from start to finish:
Ingredients
- 1 medium butternut squash (about 2 lbs), peeled and cubed
- 1 large onion, chopped
- 2 cloves garlic, minced
- 4 cups vegetable broth
- 2 tablespoons olive oil
- 1/2 teaspoon salt
- 1/4 teaspoon pepper
- 1/4 teaspoon nutmeg (optional)
- 1/2 cup cream or coconut milk (optional)
Cooking Steps
- Heat olive oil in a large pot over medium heat.
- Add onion and garlic; sauté until soft, about 5 minutes.
- Add cubed squash, broth, salt, pepper, and nutmeg.
- Bring to a boil, then reduce heat and simmer until squash is very tender, about 25 minutes.
- Remove from heat and let cool for 5 minutes.
- Insert immersion blender, fully submerge, and blend until smooth (about 1 minute).
- Stir in cream or coconut milk for extra richness.
- Adjust seasoning and serve hot.
Pro tip: For extra flavor, roast the squash cubes in the oven before adding to the soup.
This method works for many vegetable soups—just switch the main ingredient and seasonings to create endless variations.
Frequently Asked Questions
How Do I Avoid Splattering When Using An Immersion Blender For Soup?
Always keep the blender blade fully submerged in the soup before turning it on. Blend in short bursts, and start on the lowest speed. If your pot is shallow, blend in smaller batches to keep the liquid below the rim.
Can I Use An Immersion Blender For Hot Soup, Or Should I Let It Cool First?
You can blend hot soup, but let it cool for 5 minutes after cooking to reduce splattering. Never blend boiling soup. Most immersion blenders are designed for hot foods, but always check your manual to be sure.
What Should I Do If My Pureed Soup Is Too Thin Or Too Thick?
For soup that’s too thin, simmer uncovered to reduce or add cooked vegetables and blend again. For soup that’s too thick, add more broth, milk, or water a little at a time and blend until you reach your desired consistency.
Can I Puree Soup With An Immersion Blender If It Contains Meat Or Grains?
Yes, but cut meat into small pieces and cook until tender. Some grains (like rice) blend smoothly, while others (like barley) can become gluey. For best results, remove bones and blend only the parts you want smooth.
How Do I Clean An Immersion Blender Safely After Making Soup?
Unplug the blender, detach the shaft, and rinse under hot water immediately after use. Use a soft brush for stuck food. Only wash the detachable parts—never submerge the motor.
Making soup with an immersion blender is a game changer for home cooks. With the right technique, safety habits, and a little practice, you’ll enjoy smooth, flavorful soups all year long. Master these steps, and your kitchen will always be ready for a bowl of comfort.
:max_bytes(150000):strip_icc()/how-to-turn-any-vegetable-into-creamy-soup-v2-24fdba5871dd4c749b1c5e2c61c62965.jpg)
Credit: www.eatingwell.com